
Angry IP Scanner is a powerful and versatile network scanning tool that is not limited to desktop computers. You can also leverage its capabilities directly on your Android device. This guide will walk you through how to use Angry IP Scanner on Android to effectively scan networks, identify active hosts, and gather essential network information.
Angry IP Scanner is a popular choice for network administrators and enthusiasts alike because of its speed and comprehensive features. Whether you are troubleshooting network issues, auditing network security, or simply curious about the devices connected to your network, Angry IP Scanner on Android provides a convenient solution.
Key Features of Angry IP Scanner
- Scans Local and Internet Networks: Angry IP Scanner can scan both your local Wi-Fi network and IP addresses across the internet.
- Flexible IP Range Scanning: You can define specific IP ranges, scan random IPs, or even load IP lists from files.
- Detailed Host Information: Beyond just identifying live hosts, it retrieves hostname, open ports, and MAC addresses where available.
- Exportable Results: Scan results can be exported into various formats for reporting or further analysis.
- Extensible Functionality: Plugins and data fetchers can extend its features for more specialized tasks.
- User-Friendly Interface: Even on Android, the app maintains a simple and intuitive interface, making it easy to use for both beginners and experienced users.
Getting Started with Angry IP Scanner on Android
Unlike desktop versions that might require Java installation, the Android version is typically distributed as a standalone application.
-
Download and Install: You can usually find the Angry IP Scanner APK (Android Package Kit) from the official Angry IP Scanner website or reputable Android app repositories. Ensure you download from a trusted source to avoid security risks. You may need to allow installation from “Unknown sources” in your Android security settings if you are installing from outside the Google Play Store.
-
Launch the Application: Once installed, find the Angry IP Scanner icon in your app drawer and tap to open it.
-
Define the IP Range: Upon launching, you’ll be presented with options to set the IP range you want to scan. For scanning your current Wi-Fi network, the app often pre-fills a relevant range based on your device’s IP address. You can adjust the starting and ending IP addresses as needed.
-
Start Scanning: Tap the “Start” button to initiate the network scan. Angry IP Scanner will begin pinging IP addresses within the defined range to check for active hosts.
-
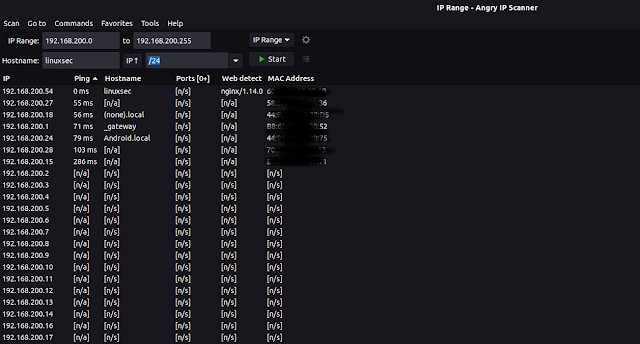
Review Scan Results: As the scan progresses, you will see a list of IP addresses. Live hosts are typically indicated with a different color or status. Select a host from the list to view more details such as hostname, open ports, and MAC address if available.

Example of Angry IP Scanner interface displaying scan results, showing live hosts and network information.
Tips for Effective Network Scanning on Android
- Wi-Fi Connection: For scanning local networks, ensure your Android device is connected to the Wi-Fi network you intend to scan.
- Network Permissions: The Angry IP Scanner app may request network permissions. Grant these permissions for the app to function correctly.
- Scan Speed: Scan speed can depend on the network size and your device’s processing power. Be patient when scanning large networks.
- Ethical Use: Always use network scanning tools ethically and legally. Only scan networks you have permission to assess.
Conclusion
Angry IP Scanner on Android brings network scanning convenience to your mobile device. Its feature set, ease of use, and portability make it a valuable tool for anyone needing to perform network analysis on the go. By following these steps, you can effectively use Angry IP Scanner on your Android device to gain insights into network configurations and connected devices.