
Experiencing the frustrating “Epson Scan cannot communicate with the scanner” error while trying to scan documents with your Epson L210? You’re not alone. This common issue prevents your computer from connecting with your scanner, even when the device appears to be properly connected. This error typically arises from setup problems or connection glitches, hindering your ability to scan important documents and images.
While outdated or missing drivers are frequently the culprit, a range of other factors can also lead to this communication breakdown. These include incorrect network configurations, firewall interference, or faulty USB connections. Fortunately, there are several effective solutions to diagnose and resolve this problem, getting your Epson L210 scanner back online. This guide will walk you through proven troubleshooting steps to fix the “cannot communicate with scanner Epson L210” error and restore your scanning capabilities.
Common Solutions to Resolve Epson Scanner Communication Issues
Let’s explore practical methods to address the communication error and get your Epson L210 scanner working smoothly again.
1. Run Epson Scan as Administrator
Granting administrative privileges to your Epson Scan software can bypass system restrictions that might be preventing it from accessing necessary resources. Operating systems often implement security measures that limit access to certain hardware functionalities, and scanning, which involves connecting external hardware, often requires elevated permissions. Running the software as an administrator allows it to operate without these limitations, potentially resolving communication issues between your scanner and computer.
-
Right-click on the Epson Scan software icon and select “Properties“.
-
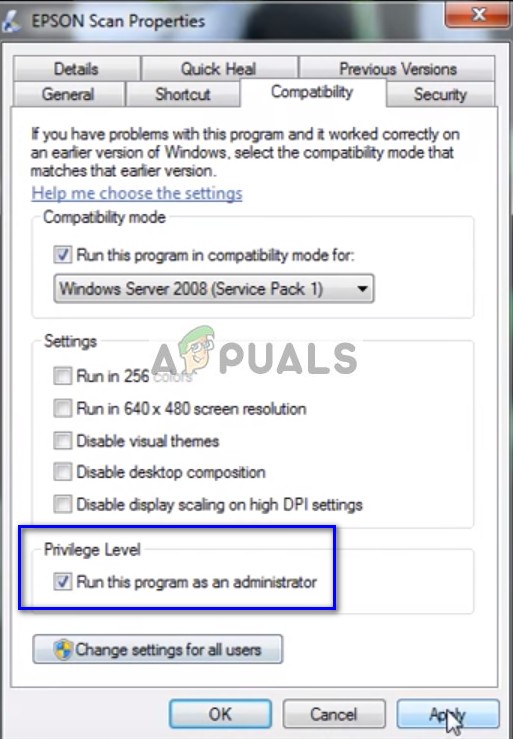
Navigate to the “Compatibility” tab within the Properties window and check the box labeled “Run this program as an administrator“. You can also experiment with compatibility mode settings if needed.
Alt text: Compatibility tab in Epson Scan Properties window, with “Run this program as an administrator” checkbox highlighted.
-
Click “Apply” to save the changes, and then click “OK” to exit. Power off your Epson scanner, disconnect the USB or network cable, wait for a few minutes, and then reconnect and power on your scanner. Test if scanning now functions correctly.
2. Troubleshoot Wireless Connection
For users utilizing a wireless connection, ensuring a stable and correct wireless setup is crucial for resolving communication errors. If the scanner’s IP address is incorrect or has changed, your computer might fail to detect it on the network. Updating the IP address within the Epson Scan settings can establish a direct communication path between your computer and the scanner, potentially resolving the “cannot communicate with scanner Epson L210” error.
-
Open Epson Scan Settings. You can find this application via a shortcut or by searching for it in the Windows search bar.
-
Within Scan Settings, locate the “Network Scanner Address” section and click “Add“. Select your Epson L210 scanner from the list of available devices.
Alt text: Epson Scan Settings window showing the Network Scanner Address section with the “Add” button highlighted.
-
To obtain the correct IP address, you’ll need to access your router’s settings. Open the Command Prompt to find your Default Gateway, which will allow you to access your router’s configuration page.
Alt text: Epson Scan Settings window with the “Enter address” field visible for manual IP address input.
-
Click on the Windows Start icon, type “cmd“, and select “Command Prompt” to open the application.
Alt text: Windows Start Menu search result showing the Command Prompt application highlighted.
-
In the Command Prompt window, type “ipconfig” and press Enter. Locate and copy the numerical value listed next to “Default Gateway“. This is your router’s IP address.
-
Open your web browser and enter the Default Gateway IP address into the address bar. This will take you to your router’s login page. Log in to your router’s settings (refer to your router’s documentation for default login credentials if needed). Navigate to the section listing attached devices or device list. Find your Epson scanner in the list and note its assigned IP address. You might need to consult your scanner’s manual to identify it correctly based on its MAC address or device name.
Alt text: Example of a router’s device list page showing connected devices and their IP addresses.
-
Return to the Epson Scan Settings application and input the scanner’s IP address you found in your router settings into the “Enter address” field. Click “Apply“. If the process is successful, your Epson L210 scanner should be added and ready for use.
Alt text: Epson Scan Settings window showing the Epson scanner successfully added to the network scanner list.
-
Optionally, click the “Test” button within Epson Scan Settings to verify the connection to your scanner.
3. Use a Shorter USB Cable
If you’re connecting your Epson L210 scanner via USB, the cable length can sometimes contribute to communication problems. Longer USB cables are more susceptible to signal degradation and data loss, which can disrupt the scanner’s connection to your computer and trigger the “cannot communicate with scanner Epson L210” error. Switching to a shorter, high-quality USB cable can minimize signal interference and stabilize the connection. Try using a shorter USB cable to see if it resolves the issue.
4. Restart Shell Hardware Detection Service
The Shell Hardware Detection service plays a critical role in enabling your computer to recognize and communicate with hardware devices like scanners and printers. If this service encounters an issue, your Epson L210 scanner might not be detected correctly, leading to communication errors. Restarting the Shell Hardware Detection service can refresh its functionality and potentially resolve the “Epson Scan cannot communicate with the scanner” error.
-
Press Windows + R keys simultaneously to open the Run dialog box. Type “services.msc” in the dialog box and press Enter to open the Services window.
-
In the Services window, scroll down to find “Shell Hardware Detection” in the list of services. Right-click on it and select “Properties“.
Alt text: Services window showing Shell Hardware Detection service properties highlighted.
-
In the Properties window, ensure that the “Startup type” is set to “Automatic“. If it’s already set to Automatic, proceed to the next step. Close the Properties window. Right-click on “Shell Hardware Detection” again and select “Restart“.
Alt text: Services window showing Shell Hardware Detection service with the “Restart” option highlighted in the right-click menu.
-
Unplug your Epson L210 scanner from your computer. Wait for a few minutes, and then reconnect it. Check if your computer now recognizes the scanner and if the scanning functionality is restored.
-
Repeat the same restart process for the “Windows Image Acquisition (WIA)” service, as this service is also essential for scanner functionality.
5. Turning off Password Protected Sharing
Password-protected sharing is a network security feature that requires a password for accessing shared files and printers on your network. While beneficial for security, it can sometimes interfere with scanner connections, especially on home networks. Disabling password-protected sharing temporarily can simplify network communication and potentially resolve the “cannot communicate with scanner Epson L210” error. If this solution works, you can re-enable password-protected sharing later if needed, or investigate more specific network sharing settings. Ensure that Printer Discovery is also enabled on your network to facilitate proper scanner recognition.
-
Press Windows + S keys to open Windows Search. Type “advanced sharing” in the search box and select “Advanced sharing settings” to open the Network and Sharing Center.
Alt text: Windows Search results showing “Advanced sharing settings” highlighted.
-
In the Advanced sharing settings window, expand the “Private (current profile)” section. Select “Turn on file and printer sharing“. Repeat this step for the “Guest or Public” networks section if applicable to your network setup.
Alt text: Advanced sharing settings window with “Turn on file and printer sharing” option selected under Private network settings.
-
Expand the “All Networks” section. Under “Password protected sharing”, select “Turn off password protected sharing“.
Alt text: Advanced sharing settings window with “Turn off password protected sharing” option selected under All Networks settings.
-
Click “Save changes” at the bottom of the window. Disconnect your Epson L210 scanner, wait a few minutes, and then reconnect it. Check if the Epson scanner utility now functions correctly.
6. Verify Printer Port (LPT1 to USB)
Older computer systems often used Line Print Terminal (LPT) ports for connecting printers and scanners. However, modern computers primarily use USB connections. If your printer port setting is incorrectly configured to LPT1, especially after a Windows upgrade, it can cause communication issues with your Epson L210 scanner. Changing the printer port setting to USB 001 (or a similar USB port) can resolve compatibility problems and fix the “Epson Scan cannot communicate with the scanner” error.
- Press Windows + R to open the Run dialog box. Type “control.exe” and press Enter to open the Control Panel.
- In the Control Panel, in the “View by” dropdown menu in the top-right corner, select “Large icons” or “Small icons” to view all Control Panel items. Then, click on “Devices and Printers“.
- Locate your Epson printer in the “Devices and Printers” window. Right-click on your printer icon and select “Printer properties” (or “Properties” depending on your Windows version).
- In the Printer Properties window, navigate to the “Ports” tab. In the list of ports, locate and select “USB 001 Virtual Printer Port” (or a similar USB port designation like USB002, USB003, etc., if USB001 is not available or doesn’t work). If the currently selected port is LPT1, change it to a USB port.
- Click “Apply” to save the changes and then “OK” to close the Printer Properties window. Unplug your Epson L210 scanner, wait for a few minutes, and then reconnect it. Test if the scanner utility now works without issues.
7. Restart Windows Image Acquisition (WIA) Service
The Windows Image Acquisition (WIA) service is fundamental for enabling image capture when you scan documents or photos on your computer. It acts as a bridge between your imaging hardware (like the Epson L210 scanner) and graphics software applications. If the WIA service malfunctions, it can disrupt scanning processes and lead to errors like “cannot communicate with scanner Epson L210”. Resetting or restarting the WIA service can often resolve these glitches without requiring driver updates.
-
Press Windows + R keys to open the Run dialog box. Type “services.msc” and press Enter to open the Services window.
-
In the Services window, find “Windows Image Acquisition (WIA)” in the list of services. Right-click on it and select “Restart“.
Alt text: Services window showing Windows Image Acquisition (WIA) service with the “Restart” option highlighted in the right-click menu.
-
Unplug your Epson L210 scanner from your computer. Wait for a few minutes, and then plug it back in. Check if the scanner now functions correctly.
8. Update Your Scanner Drivers
If none of the preceding solutions have resolved the “Epson Scan cannot communicate with the scanner” error, updating your scanner drivers is a crucial step. Outdated, corrupted, or incompatible drivers are a primary cause of communication problems between your computer and scanner. Downloading and installing the latest drivers from the manufacturer’s website ensures optimal compatibility and functionality, often resolving persistent scanner issues. You can usually find your scanner’s model number on the front of the device or its packaging to locate the correct drivers.
-
Press Windows + R to open the Run dialog box. Type “devmgmt.msc” and press Enter to open Device Manager.
Alt text: Run dialog box with “devmgmt.msc” command entered to open Device Manager.
-
In Device Manager, expand the “Imaging devices” category. Right-click on your Epson L210 scanner and select “Update driver“. Note: If your scanner is integrated into your Epson printer, you might need to update the printer’s drivers instead, which can usually be found under the “Print queues” or “Printers” category.
-
In the “Update Drivers” dialog box, choose “Browse my computer for driver software“.
-
Click the “Browse” button and navigate to the location where you downloaded the latest driver file from the Epson website. Select the driver file and click “OK“.
Alt text: Update Drivers dialog box with “Browse my computer for driver software” option selected and the “Browse” button highlighted.
-
Click “Next” to proceed with the driver update. Follow any on-screen instructions to complete the installation. Once the driver update is complete, restart your computer and check if the scanner issue is resolved.
By systematically working through these troubleshooting steps, you should be able to identify and fix the “cannot communicate with scanner Epson L210” error and restore your Epson scanner’s functionality. Updating your drivers is often the most effective long-term solution if other methods prove unsuccessful.