
For car owners and mechanics alike, an On-Board Diagnostics (OBD) II scanner is an indispensable tool. It’s your first line of defense when the check engine light illuminates, providing crucial insights into your vehicle’s health by retrieving error codes and system data. But what do you do when this vital tool suddenly refuses to connect? A “scanner won’t communicate with car” scenario can be frustrating and halt your diagnostic process in its tracks.
This comprehensive guide, brought to you by the auto repair experts at carw.store, will walk you through the common reasons why your OBDII scanner might fail to communicate with your vehicle and provide step-by-step troubleshooting to get you back on track. We’ll explore potential causes, from simple fixes to more complex issues, ensuring you have the knowledge to diagnose and address the problem effectively.
Decoding the Silence: Possible Causes of OBDII Scanner Communication Failure
When your scanner displays a dreaded “No Communication” or “Link Error” message, several culprits could be at play. Understanding these potential issues is the first step towards a solution.
-
Faulty OBDII Scanner: Just like any electronic device, your OBDII scanner can malfunction. Internal hardware failures, software glitches, or even simple wear and tear can render your scanner unable to establish a connection. This is always a good first suspect to consider.
-
Damaged OBDII Port: The OBDII port in your car, also known as the Diagnostic Link Connector (DLC), is your scanner’s gateway to your vehicle’s computer. This port can be physically damaged, with bent or broken pins, or suffer from corrosion or debris buildup, preventing a proper connection.
-
Wiring Issues: The OBDII port isn’t directly connected to your car’s computer (PCM or ECM) wirelessly. It relies on a network of wires. Damaged, disconnected, or short-circuited wires between the OBDII port and the vehicle’s computer system are a frequent cause of communication breakdowns.
-
Vehicle Battery Problems: A healthy car battery is essential for all electrical systems, including the diagnostic system. A dead, weak, or severely discharged battery may not provide enough power for the OBDII port and the car’s computer to communicate effectively with the scanner.
-
Blown Fuses: Automotive circuits are protected by fuses. A blown fuse in the circuit powering the OBDII port or the car’s computer can cut off power, leading to communication failure. This is a common and relatively easy-to-check issue.
-
PCM/ECM Malfunction: While less common, a malfunctioning Powertrain Control Module (PCM) or Engine Control Module (ECM) can also be the root cause. If the car’s computer itself is faulty, it won’t be able to communicate with any external device, including your scanner.
Step-by-Step Troubleshooting: Getting Your Scanner Talking Again
Diagnosing a “scanner won’t communicate with car” issue requires a systematic approach. Follow these troubleshooting steps, progressing from simple checks to more advanced tests.
Preliminary Checks: The First Line of Defense
Before diving into complex electrical tests, perform these quick and easy preliminary checks:
-
Visual Inspection of the OBDII Port: Carefully examine the OBDII port under your dashboard. Look for any signs of physical damage, bent or missing pins, dirt, debris, or corrosion. Clean the port gently if necessary, ensuring no pins are further damaged.
-
Scanner Self-Test (if applicable): Some scanners have a self-test function. Consult your scanner’s manual to see if it has this feature and run a self-test to rule out internal scanner issues.
-
Try a Different Scanner (if possible): If you have access to another OBDII scanner, try using it on your vehicle. If the second scanner connects successfully, it points to a problem with your original scanner.
-
Check the Vehicle’s Battery Voltage: Ensure your car battery is adequately charged. A simple voltage test with a multimeter can confirm if the battery is healthy (around 12.6V when fully charged and engine off). If the voltage is low, try charging the battery and then attempt to connect the scanner again.
Advanced Troubleshooting with a Digital Multimeter (DMM)
If the preliminary checks don’t resolve the issue, you’ll need a Digital Multimeter (DMM) to perform voltage and continuity tests. Safety First: Always consult your vehicle’s repair manual and take necessary safety precautions when working with automotive electrical systems.
TEST 1: Ground Circuit Test (DLC Pin 4)
This test verifies the ground connection for the OBDII port.
- Set your DMM to measure DC voltage.
- Connect the positive (red) lead of the DMM to DLC pin 4 (ground pin in OBDII port – usually pinout diagrams are readily available online or in your vehicle repair manual).
- Connect the negative (black) lead of the DMM directly to the negative terminal of your car battery. Crucially, do not connect to chassis ground; connect directly to the battery terminal. You may need jumper wires to reach the battery terminal.
- Turn the ignition ON (engine off).
- Reading: The voltage drop should be 0.1 Volts or less. A higher reading indicates excessive resistance in the ground circuit, which can prevent communication.
TEST 2: Ground Circuit Test (DLC Pin 5)
Repeat TEST 1 but connect the positive DMM lead to DLC pin 5 (another ground pin). This checks a secondary ground path. The acceptable voltage drop is also 0.1 Volts or less.
Note: High ground resistance or an open ground circuit will prevent the PCM from entering diagnostic mode, which is essential for scanner communication.
TEST 3: Voltage Check on Class 2 Serial Data Pin (DLC Pin 2)
This test checks if the PCM is transmitting data on the communication line. Note: DLC Pin 2 is often used for SAE J1850 PWM and VPW protocols and may not apply to all vehicles, especially Mazda MPV as noted in the original text. Consult your vehicle’s wiring diagrams.
- Keep your DMM set to measure DC voltage.
- Connect the positive (red) lead of the DMM to DLC pin 2 (Class 2 Serial Data pin).
- Connect the negative (black) lead of the DMM to a known good ground – you can use DLC pin 4, DLC pin 5, or the negative battery terminal.
- Turn the ignition ON (engine off).
- Reading: You should see approximately 5V or a fluctuating voltage between 3.5V and 5.0V. If you read 0V or significantly lower voltage, it suggests an open circuit or a problem with the PCM’s data transmission.
TEST 4: ECM Voltage Supply Test (DLC Battery + Terminal)
This test verifies if the ECM/PCM is receiving power.
- Set your DMM to measure DC voltage.
- Connect the positive (red) lead of the DMM to the DLC Battery + terminal (typically Pin 16, check your vehicle’s wiring diagram).
- Connect the negative (black) lead of the DMM to the negative battery terminal.
- Turn the ignition ON (engine off).
- Reading: The DMM should display battery voltage (around 12V+). If you read significantly lower or no voltage, it indicates a power supply issue to the ECM/PCM, potentially due to a blown fuse.
TEST 5: DLC Bias Voltage Test (Bias Terminals)
This test checks the bias voltage on the CAN bus lines, used in many modern vehicles. Note: This test is more relevant for vehicles using CAN communication protocols. Consult your vehicle’s service information.
- Set your DMM to measure DC voltage.
- Identify the DLC bias terminals (CAN High and CAN Low – typically Pins 6 and 14, but always verify your vehicle’s specific pinout).
- Connect the positive (red) lead of the DMM to either DLC bias terminal (one at a time).
- Connect the negative (black) lead of the DMM to a known good ground (negative battery terminal).
- Turn the ignition ON (engine off).
- Readings:
- Ignition ON, No Bus Activity (no scanner connected): You might expect to see around 2.5V on both CAN High and CAN Low lines in a properly biased system (though readings can vary). The original text suggests “BUS + should read 0V BUS should read 5V” which is less typical for CAN bias voltage and might refer to different signal types. Refer to your vehicle’s specific service information for expected bias voltage on CAN lines.
- Ignition ON, Bus Activity (scanner connected and attempting communication): The voltage readings on the CAN lines should vary as data is transmitted. If the voltage is static, it might indicate a lack of communication.
Additional Notes and Next Steps
- Check Fuses: Locate the fuse box (often under the dashboard or in the engine compartment) and check the fuses related to the OBDII port and the ECM/PCM. A blown fuse is a common cause of power loss. Replace any blown fuses with the correct amperage rating.
- Inspect Wiring Thoroughly: Carefully inspect the wiring harness connected to the OBDII port and the ECM/PCM for any signs of damage, fraying, or corrosion.
- PCM/ECM Possibility: If all wiring and power supply checks are good, and you still have a “scanner won’t communicate with car” issue, a faulty PCM/ECM becomes a more likely possibility.
ADDITIONAL INFORMATION: A failing PCM can sometimes become apparent after attempting to fix wiring issues. As seen in the image below, even after addressing wiring problems, communication may still fail, indicating internal PCM damage.
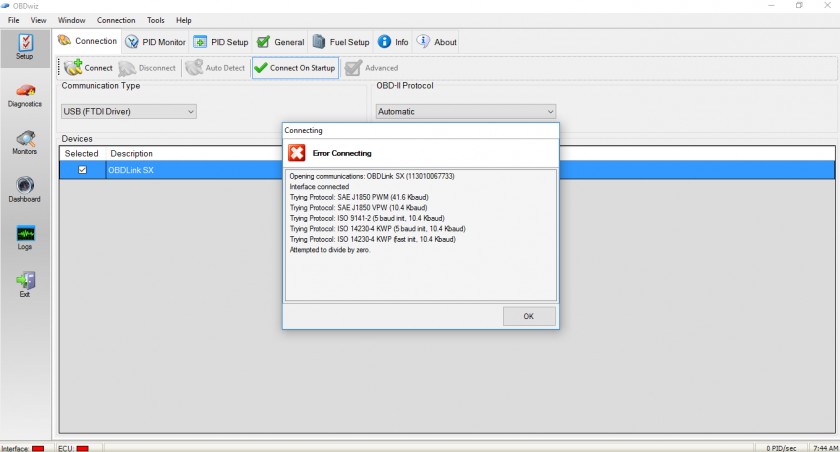 Diagnostic scanner displaying 'No Communication' error, indicating a failed attempt to connect to the car's PCM, a common sign of a 'fried' PCM and a key symptom when your scanner won't communicate with car.
A new PCM, properly installed and programmed, should resolve communication issues related to a faulty computer. However, always double-check the fuse box and wiring to rule out simpler causes before assuming PCM failure.
Conclusion: Restoring Communication and Getting Back to Diagnostics
A “scanner won’t communicate with car” situation can be a roadblock in vehicle diagnostics, but by systematically checking potential causes and performing these troubleshooting steps, you can often pinpoint the problem. From simple issues like a faulty scanner or blown fuse to more complex problems with wiring or the PCM, this guide provides you with the knowledge to investigate effectively.
If you’ve gone through these steps and are still facing communication issues, it’s advisable to seek professional help from a qualified automotive technician. They have advanced diagnostic tools and expertise to tackle more complex electrical and computer system problems, ensuring your vehicle’s diagnostic system is functioning correctly and you can get back to accurately diagnosing and repairing your car.