
Scanners are essential electronic devices that capture images from physical objects and convert them into digital formats. This digitized information can be stored on computers for viewing and further modification using software applications. In the realm of electronic data transmission, scanning is considered a reliable and effective method for transmitting images. The fundamental principle of a scanner involves analyzing an image, reproducing it, and transforming it into a digital image through optical character recognition techniques.
Scanners come in a variety of shapes and sizes, each designed for specific purposes and user needs. Understanding the different types of scanners and their applications can help you choose the right device for your home or business needs. Here’s a detailed look at some of the most popular types of scanners available today.
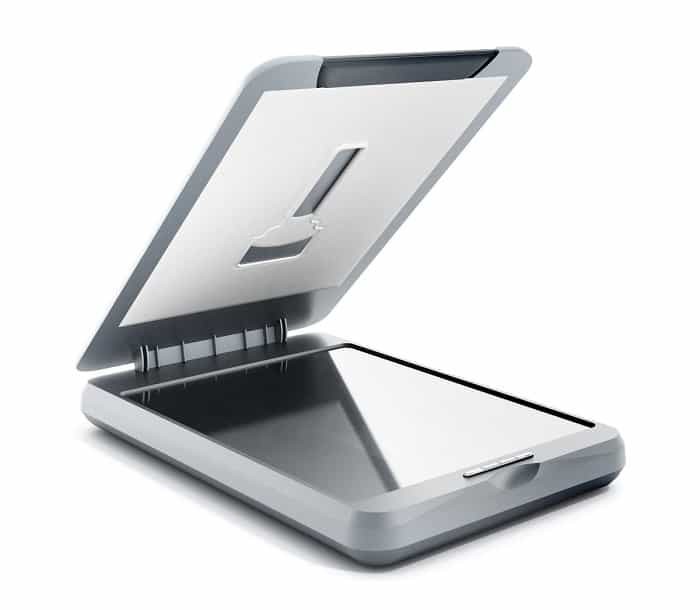
1. Flatbed Scanners
Flatbed scanners are perhaps the most recognizable type of scanner, commonly found in homes and offices. These scanners typically sit on a desk and feature a hinged lid that opens to reveal a glass scanning surface. Flatbed scanners are available in various sizes, accommodating standard paper sizes up to legal and even larger formats.
Many flatbed scanners are also available in all-in-one models, integrating scanning and printing functionalities into a single device. This is particularly useful for saving desk space. Flatbed scanners are exceptionally versatile, making them ideal for scanning books, newspaper articles, and even DVD cases for those looking to digitize their media libraries.
While some flatbed scanners are capable of scanning photos, achieving high-quality photo scans often requires models with higher resolutions. However, flatbed scanners are not known for their speed. Each item must be manually placed on the scanning bed before processing. For large volumes of documents, while reliable, they might not be the quickest option compared to other types.
How to Use a Flatbed Scanner:
- Place the document: Open the lid and place your document face-down on the glass surface, aligning it with the corner marks.
- Close the lid: Ensure the lid is closed to block out ambient light and ensure a clear scan.
- Initiate scanning: Use the scanner’s software interface on your computer to preview and initiate the scan. Configure settings like resolution and color mode as needed.
- Save the scanned document: Once scanned, save the digital file in your desired format (e.g., PDF, JPG, PNG).
2. Sheetfed Scanners
As the name suggests, sheetfed scanners operate by feeding documents through a slot, either vertically or horizontally. The primary components of a sheetfed scanner include a sheet-feeder, a scanning module, and calibration sheets. While often pricier than other types, sheetfed scanners offer significant time savings, particularly when dealing with multiple pages.
In contrast to flatbed scanners where the sensor and light source move across a stationary glass panel, in sheetfed scanners, these components remain static. Instead, the document itself moves through the scanner. These scanners are best suited for scanning single-page documents. A key limitation is their inability to scan thick objects like books.
The main advantage of sheetfed scanners is their ability to handle multiple documents automatically. Documents can be placed in a feeder tray, and the machine will pull each page through for scanning, much like a photocopier. This batch scanning capability significantly speeds up the digitization process for stacks of papers.
How to Use a Sheetfed Scanner:
- Prepare documents: Ensure documents are loose and free of staples or paper clips.
- Load the feeder: Stack your documents in the input tray, following the scanner’s guidelines for orientation and capacity.
- Adjust settings: Use the scanner software to set scan parameters like resolution, duplex scanning (if supported), and file format.
- Start scanning: Initiate the scan from the software interface. The scanner will automatically feed and scan each page.
- Retrieve scanned files: Once complete, access your digital documents saved on your computer.
3. Photo Scanners
While standard scanners can sometimes handle photos, dedicated photo scanners are designed to meet the specific needs of digitizing photographs, slides, and negatives. Scanning photos effectively requires higher resolution and color depth than document scanning. Although many all-purpose scanners can scan photos, a dedicated photo scanner is the ideal choice for those focused on digitizing film negatives or slides.
Photo scanners incorporate specialized technology to handle slides and negatives and often include built-in software for enhancing and restoring old photos. Features like dust and scratch removal and color correction are common in photo scanners, helping to revive aging prints and film.
Epson photo scanners are a prime example of high-quality photo scanning devices. While they may come at a higher price point than general-purpose scanners or printers, they often include adapters for scanning slides and negatives and offer significantly higher scanning resolutions compared to other scanner types, ensuring detailed and vibrant digital images of your precious photos.
How to Use a Photo Scanner:
- Prepare photos/slides/negatives: Clean your photos or slides using a soft, lint-free cloth. For negatives, handle with care to avoid fingerprints.
- Load into scanner: Use the appropriate holders or trays provided with the photo scanner for photos, slides, or negatives.
- Configure settings: In the software, select photo scanning mode, choose high resolution (DPI), color depth, and enable any image enhancement features.
- Preview and scan: Preview the scan to ensure proper alignment and settings. Adjust if necessary and then initiate the final scan.
- Edit and save: Use the included software or other photo editing tools to further enhance and save your digitized photos.
4. Handheld Scanners
Handheld scanners differ significantly from sheetfed and flatbed models. Instead of placing the document into the scanner, you manually move the handheld scanner over the item being scanned. Users glide the scanner across the surface of a document or object to capture its details.
These scanners require a steady hand to ensure accurate image capture. Even slight movements or instability can result in distorted or inaccurate scans. A familiar example of a handheld scanner is the standard tag scanner used in retail stores to read product barcodes and prices. For document scanning, specialized handheld scanners are available that are designed for capturing text and images on the go.
How to Use a Handheld Scanner:
- Power on and calibrate: Turn on the scanner and calibrate it according to the manufacturer’s instructions, usually by scanning a white surface.
- Position the scanner: Place the scanner at the edge of the document or area you want to scan.
- Scan in a smooth motion: Press the scan button and glide the scanner steadily and smoothly across the document. Maintain consistent speed and pressure.
- Monitor scanning: Watch the scanner’s display or software interface (if connected to a computer) to ensure the entire area is scanned.
- Process and save: The scanned image is usually stored in the scanner’s memory or transferred to a computer for processing and saving.
5. Portable Scanners
Portable scanners are compact handheld devices or small desktop units designed for scanning on the go. Some are as small as a pen, while higher-quality portable scanners are slightly larger but still easily transportable. Their compact size makes them ideal for users who need to scan documents in various locations.
While most portable scanners may not achieve the high resolution of flatbed scanners, they are perfectly suitable for many tasks, particularly for researchers in libraries or for scanning receipts and small documents while traveling.
Using portable scanners effectively often requires practice to achieve good quality scans. The advantage is the ability to quickly capture information in digital format for later review and organization, wherever you are.
How to Use a Portable Scanner:
- Charge or power up: Ensure the scanner is charged or has fresh batteries.
- Insert media (if applicable): Some portable scanners use microSD cards for storage – insert one if needed.
- Scan the document: Place the scanner on the document and press the scan button. Glide it over the document or feed the document through, depending on the model.
- Review and transfer: Check the scan quality on the scanner’s screen. Transfer the scanned images to your computer via USB or wirelessly.
- Organize digital files: Organize and manage your scanned documents on your computer.
6. Drum Scanners
Drum scanners represent a high-end scanning technology, utilizing photomultiplier tubes (PMT) to scan images, unlike flatbed scanners which use charge-coupled devices (CCD). Photomultiplier tubes are highly sensitive vacuum tubes that detect light.
In a drum scanner, the image is mounted on a glass cylinder or drum. As a light beam moves across the image, the reflected light is captured by the PMTs and processed. Drum scanners are known for their exceptionally high resolution and dynamic range, making them the choice for critical, detail-oriented scanning in professional settings like high-end publishing and archiving.
However, drum scanners are less common than flatbed scanners due to their high cost, large size, and complex operation. They are primarily used when the highest possible image quality is required, such as in museum-quality archival or fine art reproduction.
How Drum Scanners Work (Overview):
- Mounting the original: The original artwork or photograph is carefully mounted onto a clear acrylic cylinder (the drum).
- Scanning process: The drum rotates at high speed while the scan head, containing the PMT, moves along the axis of the drum, scanning line by line.
- Light and detection: A bright light source illuminates the original, and the reflected light is captured by the PMTs, which convert light into electrical signals.
- Digital conversion: The signals are then converted into digital data, creating a highly detailed digital image.
7. Film and Slide Scanners
While high-end photo scanners can produce excellent results for scanning 35mm film, negatives, or slides, dedicated film and slide scanners are specifically designed for mass digitization of film formats. These scanners may sacrifice some image quality compared to drum scanners or high-end photo scanners, but they offer speed and efficiency for processing large quantities of slides and film strips.
Film and slide scanners often include trays or feeders that can hold multiple slides or strips of film, allowing for batch scanning. This is particularly useful for archiving large collections of photographic film.
How to Use a Film and Slide Scanner:
- Prepare film/slides: Clean slides and film strips carefully. Cut film strips into manageable lengths if needed.
- Load into holders: Place slides or film strips into the appropriate holders or trays.
- Insert holders into scanner: Insert the holders into the scanner, following the scanner’s instructions.
- Set scan parameters: Use the software to choose film type, resolution, and any color correction or dust removal options.
- Batch scan (if applicable): If scanning multiple slides or film strips, use the batch scanning feature for automated processing.
8. Multifunction Scanner Printers
Multifunction printer/scanner devices, often called all-in-one printers, combine printing, scanning, and photocopying functionalities into a single unit. Many also include fax capabilities. These devices are convenient for users with occasional scanning needs or when high-resolution scanning is not a primary requirement.
Multifunction scanners are practical for both home and office environments, especially where space is limited. The included software allows users to scan photos and documents. Many modern multifunction devices also offer wireless connectivity, enabling multiple computers and devices to access scanning and printing features.
How to Use the Scanner Function on a Multifunction Printer:
- Select scan mode: On the device’s control panel or through the software interface, select the scan function.
- Choose scan type: Specify whether you are scanning a document or photo, and choose color or black and white.
- Place document: Lift the scanner lid and place your document face-down on the glass, or use the automatic document feeder (ADF) for multi-page documents.
- Adjust settings: Configure resolution, file format (PDF, JPG, etc.), and destination folder in the software.
- Start scan: Initiate the scan from the device or the software.
- Retrieve scanned file: Access the scanned digital file from your computer or the designated network folder.
9. Production Scanners
Production scanners are designed for high-volume, rapid document scanning, similar in operation to sheetfed scanners but built for much greater speed and durability. These scanners are engineered to handle large daily workloads and are equipped with robust automatic document feeders to quickly process stacks of documents.
Production scanners are significantly more expensive than flatbed or standard sheetfed scanners. They are targeted towards publishing houses, large corporations, and businesses that need to scan thousands of documents daily. Features like ultrasonic double-feed detection and advanced image processing enhance efficiency and accuracy in high-volume scanning environments.
Key Features of Production Scanners:
- High speed: Scan hundreds or even thousands of pages per day.
- Large ADF capacity: Handle large stacks of documents automatically.
- Durability: Built for continuous, heavy-duty use.
- Advanced features: Often include OCR, barcode recognition, and image enhancement tools.
10. Specialty Scanners
Specialty scanners are designed for specific tasks, such as scanning business cards, receipts, or books. While some of these tasks can be performed by flatbed, sheetfed, or portable scanners, specialty scanners streamline the process and offer features tailored to these specific document types.
For example, business card scanners often include software for automatically extracting contact information and organizing it into a digital contact database. Receipt scanners may offer features for expense tracking and integration with accounting software. Book scanners are designed to handle thick books without damaging their spines, often using overhead scanning technology.
Examples of Specialty Scanners:
- Business Card Scanners: Quickly digitize and organize contact information.
- Receipt Scanners: Streamline expense tracking and financial record-keeping.
- Book Scanners: Scan books without disbinding them, often with page-flattening technology.
- 3D Scanners: Capture three-dimensional objects for CAD modeling, reverse engineering, and digital archiving.
Technological advancements have provided a wide array of scanner types and functionalities to meet diverse needs. From basic home use to high-volume professional applications, understanding the “jenis-jenis scanner” (types of scanners) and “cara penggunaannya” (how to use them) is crucial for selecting the right tool for your digitization tasks. What type of scanner do you use at your office or home?