A flashing check engine light can be intimidating. While some drivers might know how to tackle mechanical issues, most reach for their vehicle manual. But there’s a simpler solution: using a car scanner to read OBD codes. This guide provides a comprehensive walkthrough on how to read a car scanner and interpret the results.
Understanding How To Read Car Scanner results, specifically OBD (On-Board Diagnostics) codes, is invaluable for both personal and business use. For personal car owners, it can save time and money on unnecessary trips to the mechanic. For businesses managing fleets, understanding OBD codes is crucial for efficient vehicle maintenance and minimizing downtime. This knowledge complements fleet management software and GPS tracking solutions, forming a comprehensive vehicle management strategy.
A check engine light can indicate various problems, from minor issues like a loose gas cap to more serious concerns with the fuel system, ignition, transmission, or emission controls. Decoding these warnings starts with understanding OBD codes.
Understanding OBD Codes and Scanners
Modern vehicles have onboard diagnostic computers (OBDs) that store diagnostic trouble codes (DTCs), commonly called OBD codes or OBD-II codes. These five-letter codes pinpoint the issue. An OBD scanner, a handheld device with a 16-pin connector, plugs into the vehicle’s OBD port (DLC) and retrieves these codes.
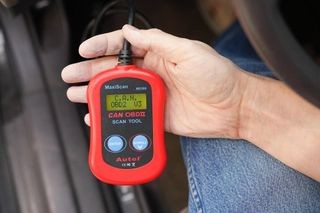
An OBD-II scan tool
Step-by-Step Guide to Reading Car Scanner Codes
Here’s how to read a car scanner and interpret the OBD codes:
1. Locate and Connect the OBD Scanner
Find the OBD port, usually under the driver’s side dashboard near the pedals. Consult your owner’s manual for the exact location. Plug the scanner’s 16-pin connector into the port.
2. Power On and Initialize
Turn the ignition on without starting the engine. This powers the scanner. The scanner will establish communication with the vehicle’s computer.
3. Input Vehicle Information (If Required)
Some scanners require the Vehicle Identification Number (VIN), make, model, and engine type for more accurate readings.
4. Access Trouble Codes
Navigate to the “Codes” or “Trouble Codes” menu on the scanner. You might need to choose between “Active Codes” (currently causing issues) and “Pending Codes” (occurred but haven’t triggered the check engine light).
An OBD2 Scanner Displaying Codes
5. Deciphering the Code: First Character
The first character provides a general categorization:
- P: Powertrain (engine, transmission)
- B: Body (airbags, power seats)
- C: Chassis (ABS, suspension)
- U: Network communication
6. Deciphering the Code: Second Character
The second character indicates if the code is generic (common to most cars) or manufacturer-specific:
- 0, 2, 34-39 (for P), 0, 3 (for B), 0, 3 (for C), 0, 3 (for U): Generic
- 1, 30-33 (for P), 1, 2 (for B), 1, 2 (for C), 1, 2 (for U): Manufacturer-specific
7. Deciphering the Code: Third Character
This character narrows down the problem area within the system identified by the first character. For powertrain (P) codes:
- 1: Fuel or Air Metering
- 2: Fuel or Air Injection
- 3: Ignition System
- 4: Emissions
- 5: Speed/Idle Control
- 6: Computer/Electronics
- 7-9: Transmission
Another Example of an OBD Scanner
8. Deciphering the Code: Final Two Characters
These pinpoint the specific fault. Use online OBD code lookup tools like OBD-Codes.com for detailed descriptions and potential solutions.
Conclusion
Reading a car scanner and understanding OBD codes empowers car owners and fleet managers to diagnose vehicle problems effectively. While interpreting the codes’ structure provides valuable clues, using online resources for precise definitions and troubleshooting steps is essential. This knowledge facilitates informed decisions regarding repairs and maintenance, saving both time and money.