
Replacing a faulty vapor canister can significantly improve your vehicle’s refueling experience. This guide provides a step-by-step walkthrough of a DIY Vapor Canister Replacement, based on a real-life experience. While seemingly complex, with the right tools and a bit of patience, you can tackle this job yourself.
Locating the Vapor Canister
Many online tutorials might mislead you about the vapor canister’s location. Instead of being easily accessible under the car, it’s often located on top of the fuel tank, requiring tank removal for access. This guide details this less common, yet crucial scenario.
Preparing for the Replacement
Before starting, gather necessary tools like a jack, jack stands, 2x4s for support, a 15mm socket wrench, a 10mm socket wrench, a large screwdriver, a small pick (like a dental pick), and a large open-end wrench. Running the vehicle until near empty significantly reduces the tank’s weight and makes the job safer and easier.
To begin, secure the vehicle on ramps or jack stands. Inside the vehicle, remove the 10mm bolts holding the fuel cap door in place to prevent accidental damage. Disconnect the negative battery terminal as a safety precaution. Underneath the car, locate and disconnect the electrical connector to the purge valve. Using a 15mm socket, remove the bolts for the crossmember supporting the fuel tank.
Lowering the Fuel Tank
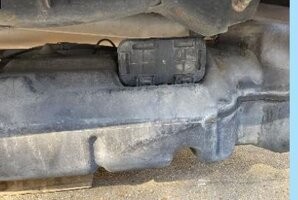
Carefully support the fuel tank with jacks and 2x4s. Remove the 15mm bolts securing the fuel tank straps. Slowly lower the tank, using the jacks for controlled descent. For additional clearance, place a 2×4 on the ground and rest the tank on it after removing the jacks. With the tank lowered, the vapor canister should be visible near the rear tires.
Replacing the Canister
The vapor canister is usually held in place by retainers. Use a large screwdriver to carefully pry these retainers loose. Once loose, swing the canister outwards to access the hoses. A small pick helps disconnect the push-on hose connectors. Install the new vapor canister and reconnect the hoses.
Reinstalling the Fuel Tank and Final Steps
Securing the canister back in its slot can be challenging. Using a large open-end wrench to pry down on the canister while simultaneously widening the retaining slots might be necessary. Reinstall the fuel tank, straps, crossmember, and purge valve electrical connector. Be mindful of the purge valve wire routing to avoid pinching it. Finally, reattach the fuel cap door and reconnect the battery.
Confirming the Fix
The ultimate test is refueling. A successful vapor canister replacement will allow for a normal, unrestricted fuel flow. This often translates to a significantly faster refueling time.
Conclusion
Replacing a vapor canister located on top of the fuel tank is a more involved process than initially expected. However, by following this guide and exercising caution, you can complete this repair yourself, saving on labor costs and experiencing the satisfaction of a DIY success. Remember to consult your vehicle’s specific repair manual for detailed instructions and torque specifications.