
Upgrading the software on your RNS 510 navigation system can significantly improve its performance and functionality. This guide provides a step-by-step walkthrough of the Rns 510 Software Upgrade process, from determining your current version to loading the latest maps.
Determining Your RNS 510 Hardware and Firmware Version
Before initiating an RNS 510 software upgrade, it’s crucial to identify your current hardware and firmware revision. This information will determine the appropriate upgrade path. You can find this information by accessing the hidden service menu:
- Press and hold the “Setup” button for approximately 10 seconds. A service menu should appear.
- If the menu appears, select “Version Info” to display your current hardware and firmware versions. If this menu doesn’t appear, you likely have an older firmware version that doesn’t support this feature. In this case, proceeding with the firmware 5238 is generally safe for units from 2005 to October 2013.
Obtaining the RNS 510 Firmware Update
Firmware version 5238 is widely compatible with various RNS 510 hardware revisions (C3-C12). It also includes a Video-In-Motion (VIM) hack enabling DVD playback while driving.
Finding Download Links:
While original download links from the source material are no longer valid, updated links for firmware 5238 can often be found within online forums dedicated to RNS 510 upgrades. Search for “RNS 510 firmware 5238 download” to locate current resources. You will need to download three parts of the firmware and then combine them into a single ISO file.
Creating a Bootable CD:
Once downloaded, use a program like 7-Zip to extract and merge the three parts into a single ISO image file. Burn this ISO image onto a CD-R at the slowest possible speed for optimal compatibility with the RNS 510’s optical drive.
Backup and Recovery:
Before proceeding with the RNS 510 software upgrade, it’s highly recommended to back up any important data stored on the unit. While not always necessary, the upgrade process can sometimes result in data loss. Having a recovery ISO on hand is also a wise precaution in case the upgrade fails. Search online forums for “RNS 510 recovery ISO” for download options.
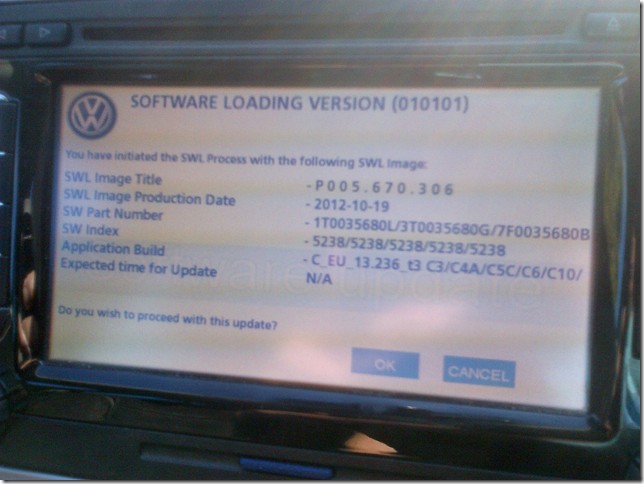
Performing the RNS 510 Firmware Upgrade
- Preparation: Open your car but do not insert the key into the ignition.
- Initiating the Upgrade: Insert the firmware CD-R into the RNS 510. The unit should power on and begin reading the disc. If it doesn’t, press the power button. Alternatively, you can manually enter software update mode by pressing and holding the “Setup,” “Eject,” and “Info/Mic” buttons simultaneously.
- Upgrade Process: The RNS 510 will guide you through the upgrade process. Follow the on-screen prompts. The process will take approximately one hour and involve several reboots. Do not interrupt the process.
Important Note: There’s a possibility of losing map data and music files during the firmware upgrade. Be prepared to reload your maps using a map DVD or SD card method.
Upgrading Maps on the RNS 510
After a successful firmware update, you’ll likely need to update your maps. Due to the large size of modern map data, using an SD card is the recommended method.
Preparing the SD Card and Map Loader
- Downloading Necessary Tools: Download the “maps-tool” utility. This tool prepares the map data for SD card installation.
- Formatting the SD Card: Format an SD card (at least 8GB) using FAT32 with the default allocation size.
- Using the maps-tool: Run the “maps-tool,” select the map ISO as the source, and the SD card as the destination. The tool will split the map data into manageable files for the RNS 510.
- Burning the Loader CD: The “maps-tool” also creates an ISO image (sd_to_hdd_fw.iso). Burn this ISO onto a CD-R at the slowest possible speed. This disc will boot the RNS 510 into a mode that allows it to read map data from the SD card.
Loading Maps from the SD Card
- Initial Setup: With the engine off and the key out of the ignition, power on the RNS 510 and insert the prepared SD card. You should hear a short test MP3 file play, confirming the SD card is readable.
- Entering Upgrade Mode: Enter software upgrade mode by pressing and holding “Setup,” “Eject,” and “Info/Mic.”
- Inserting the Loader Disc: After 20 seconds, insert the loader CD-R (sd_to_hdd_fw.iso).
- Map Transfer Process: The unit will begin copying the map data from the SD card to the internal hard drive. This process takes approximately 30 minutes. The display may show “31% complete” throughout the process; this is normal.
- Completion: Upon completion, the RNS 510 will reboot and display a success message. The loader disc will be ejected, and the new maps will be available.
Conclusion
Successfully upgrading the software and maps on your RNS 510 can breathe new life into your navigation system. While the process requires careful attention to detail, this comprehensive guide provides the necessary steps for a successful RNS 510 software upgrade, ultimately enhancing your driving experience.