
Are you looking to set up your Fujitsu fi-7160 scanner, or perhaps an older model like the fi-6110, for optimal document management? This guide provides a detailed walkthrough on how to install a Fujitsu scanner, specifically focusing on the Fujitsu fi-7160, a model recommended for its reliability and performance, especially when used with applications like PCC EHR. While the phrase “Cara Menginstal Scanner Fujitsu” might be your search term, this article aims to be your definitive English resource for getting your Fujitsu scanner up and running smoothly. All scanner settings are managed through the intuitive PaperStream software suite, and this guide will cover every step, from driver download to final configuration.
Step-by-Step Guide to Install Your Fujitsu fi-7160 Scanner on Windows
To begin, follow these detailed instructions to successfully install and configure your Fujitsu fi-7160 scanner on a Microsoft Windows PC for seamless operation, particularly if you intend to use it with PCC EHR.
1. Downloading the Necessary Scanner Driver and Application
Before you begin the software installation process, it’s crucial to disconnect your scanner from your computer.
Unplug Your Scanner
Ensure your Fujitsu fi-7160 scanner is unplugged from your workstation. These scanners typically connect via a USB cable. Disconnecting it now prevents potential installation conflicts.
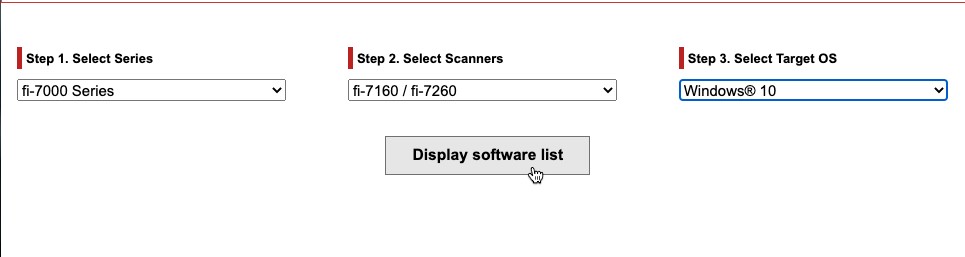
Navigate to the Fujitsu Downloads Page
Open your preferred web browser and go to the official Fujitsu fi Series downloads page: https://imagescanner.fujitsu.com/global/dl/. This is your central hub for all necessary software.
Download the PaperStream IP Driver
On the Fujitsu downloads page, you’ll need to specify your scanner details. Select the appropriate:
- Series: fi Series
- Scanner Model: fi-7160 (or your specific model)
- Operating System: Choose your PC workstation’s operating system (e.g., Windows 10, Windows 11).
After selecting these, click the “Display software list” button.
Locate “PaperStream IP (TWAIN)” in the list of available software and click the “Download” button next to it.
If the download doesn’t start automatically, look for and click on the “Download” link that resembles “PSIPTWAIN(version number).exe”.
When prompted by your browser, choose “Save” to download the file to your computer, typically to your Downloads folder.
Download the PaperStream Capture Application
After downloading the driver, click the “Back” button in your web browser to return to the previous page where the software list is displayed. In the “Applications” section, find “PaperStream Capture” and click the “Download” button next to it.
You will be prompted to enter your scanner’s serial number. This is usually located on the scanner itself. Enter the serial number and click “OK”.
Similar to the driver download, if the application download doesn’t begin automatically, click the “Download” link named like “PSC(version number).exe”. Select “Save” if prompted to run or save the file.
2. Installing the Scanner Driver and PaperStream Application
With both the PaperStream IP driver and the PaperStream Capture application downloaded, you are now ready to install them.
Launch the PaperStream IP Driver Installer
Open your Downloads folder on your computer. Locate the driver installer file, “PSIPTWAIN(version number).exe”, and double-click to launch it. If Windows prompts you to allow the app to make changes to your device, click “Yes”. The installer will initiate, run a script to install necessary files, and then the PaperStream IP Driver Setup window will appear. Click “Next” to proceed.
Install the PaperStream IP Driver Components
In the PaperStream IP Driver Setup window, you’ll see a screen with component selections. Ensure that both “PaperStream IP Driver” and “Scanner Central Admin” are checked. These are essential for full scanner functionality. Click “Next”.
Carefully read the license agreement. If you agree to the terms, check the “I accept the agreement” box and then click “Install”.
The installation process may take a few minutes to complete. Once finished, you’ll see a completion screen where all three boxes (“PaperStream”, “Software Panel”, and “Scanner Agent”) should be checked, and the “Stop” button will have changed to “Close”. Click “Close” to finalize the driver installation.
Install the PaperStream Capture Application
Return to your Downloads folder and find the PaperStream application installer file, “PSC(version number).exe”. Double-click to open it. You might be prompted to choose your language. After language selection (if prompted), the PaperStream setup window will appear. Carefully configure the following options as recommended:
- Check “I accept the terms in the License Agreement”.
- Select “Basic (use basic functions with no limitations)”. This provides full functionality without advanced profile limitations.
- Uncheck “Display sample profiles”. This keeps your profile list clean and uncluttered.
- Uncheck “Show Welcome on startup”. This prevents the welcome screen from appearing every time you open the application, streamlining your workflow.
Click “Install” to begin the PaperStream Capture application installation. When the installation is complete, click “Finish”. You may be prompted to click “OK” – do so to finalize the application setup.
3. Configuring Scanner Buttons for Efficient Scanning
Now that the software is installed, it’s time to physically connect your scanner and configure its buttons for optimal use.
Plug in Your Scanner
Connect your Fujitsu fi-7160 scanner to your workstation using the USB cable. For the best scanning speed, PCC recommends plugging your scanner into a USB 3.0 port if your computer has one (these are often blue).
Open the Windows Printers & Scanners Settings Panel
Access the “Printers & scanners” settings in Windows. You can easily find this by typing “Printers & scanners” in the Windows Start menu search bar and selecting the settings option. Once opened, your fi-7160 scanner should be listed under “Printers & scanners”.
Select Your Scanner and Access Properties
Click once on the “Fujitsu fi-7160” device in the list to select it. Then, click the “Manage” button.
In the device management window, click “Properties” to access the scanner’s properties settings.
Configure the Scan Button to Launch PaperStream Capture
In the scanner’s Properties window, navigate to the “Events” tab.
Within the “Events” tab, configure the following settings to link the scanner’s physical scan button to the PaperStream Capture application:
- Ensure “Select an event:” is set to “Scan Button”. This specifies that you are configuring the action for when the physical scan button on the scanner is pressed.
- Select “Start this program:”. This tells Windows to launch a specific program when the scan button is pressed.
- From the dropdown menu below “Start this program:”, choose “PaperStream Capture”. This designates PaperStream Capture as the application to launch.
With these settings configured, pressing the scan button on your Fujitsu fi-7160 scanner will now automatically launch the PaperStream Capture application, streamlining your scanning process. Click “OK” to save these settings and close the properties window.
4. Configuring Scanner Profile and Scan Destination
The next crucial step is to configure a scanner profile within PaperStream Capture and set the destination for your scanned documents, especially if you are integrating with PCC EHR.
Open the PaperStream Capture Application
Launch the PaperStream Capture application. You can do this from the Windows Start menu or by double-clicking the PaperStream Capture desktop icon if you created one during installation.
Create a New Scanner Profile
Once PaperStream Capture is open, look for the Lines menu icon, typically located next to the blue “Scan” button. Click this menu icon.
From the dropdown menu, select “Configure Profiles”. In the Profile Configuration window, click the plus (+) button to add a new scanner profile.
Name Your Scanner Profile
In the Profile Configuration menu, on the left-hand side, select “1. Name”. In the “Name” field, enter “EHR” (or another descriptive name of your choice) for this profile. This will help you easily identify this profile later.
Verify the Scanner Source
Select “2. Source” from the left menu. Confirm that “PaperStream IP fi-7160” is visible and selected in the “Source” box. This confirms that PaperStream Capture recognizes your installed scanner.
If “PaperStream IP fi-7160” is not listed in the “Source” box, there might be an issue with the driver installation. In this case, it’s recommended to contact support for troubleshooting assistance at 1(800)722-7708 or [email protected].
Configure Source Parameters for Optimal EHR Scanning
In the “Source Parameters” box, set the following configurations for optimal scanning for EHR systems:
- Color Mode: Set to “Auto Color”. This allows the scanner to automatically detect and scan documents in color when necessary and grayscale when color is not needed, optimizing file size and quality.
- Resolution: Set to “200 dpi”. This resolution is generally sufficient for document clarity in EHR systems while keeping file sizes manageable.
- Leave “Paper Size”, “Sides”, and “Continuous Scan” at their default settings unless you have specific needs to change them.
Configure Display Options for Efficient Workflow
In the “Display Options” section, configure the following to streamline your scanning workflow:
- Check “Release After Scan”. This automatically releases the scanned document after scanning is complete, making the scanner ready for the next document.
- Check “Minimize App. During Scan”. This minimizes the PaperStream Capture application window during scanning, keeping your desktop less cluttered.
- Do not select “Exit App After Scan”. Exiting the application after each scan can slow down the overall scanning process if you are scanning multiple documents.
- Leave “Mark Options” at the default settings unless you require specific mark options.
Save Your Scanner Driver Profile
Click “Save As” under the “Scanner Driver Profile” dropdown menu. When prompted, name this driver profile “EHR” to match your PaperStream Capture profile name and click “OK”.
Configure the Scanner Profile Destination Folder
Select “3. Destination” from the left menu. Change the default output format from “TIF” to “PDF” for better compatibility and smaller file sizes.
In the “Folder” field, you need to specify the network path where scanned documents will be saved. For PCC EHR, this is typically a network bucket. Type the following path, replacing the placeholders with your practice’s information:
\\acro\scanning\bucket###
- Replace “acro” with your PCC practice acronym (ensure it’s in lowercase).
- Replace “###” with your chosen bucket number (e.g., bucket001, bucket002, etc.).
Remember to use backslashes “” and ensure the practice acronym is in lowercase.
To determine the correct bucket number, log in to PCC EHR, go to the “Configuration” menu, select “Documents”, and visit the “Import Documents” tab. Choose a bucket from the “File Source” column. For more detailed information on buckets, refer to Configure Document Categories, File Sources, and Default Behaviors.
Save Your Scanner Configuration
Click “Save” to save all the profile configurations. If a warning message appears, click “Yes” to confirm and then click “Close” to close the Profile Configuration window.
Return to the Main PaperStream Capture Screen
Click the “Back” button to return to the main PaperStream Capture application screen.
Map Your Scanner to the EHR Profile in Administrator Tool
Click the Lines menu again and select “Administrator Tool”. In the Administrator Tool window, select “Usability” from the left menu. In the “Scan” dropdown menu, choose the “EHR” profile you created. This step ensures that the “EHR” profile is the active profile when you use the scanner.
Save Your Final Scanner Profile Settings
Click “Save” in the Administrator Tool, and then click “Close” to return to the main PaperStream Capture screen. Your “EHR” profile and associated rules are now completely set up, and you are ready to perform a test scan.
5. Testing Your Scanner and Document Import to PCC EHR
With the installation and configuration complete, it’s essential to test the scanner to ensure it’s working correctly and that scanned documents are being properly imported into PCC EHR.
Perform a Test Scan
Follow the instructions provided with your Fujitsu fi-7160 scanner to scan your first document. The very first scan after installation might be slightly slower as services are initialized for the first time.
Verify Document Import in PCC EHR
Once the scan is complete, log in to your PCC EHR system. Navigate to the “Import Documents” section within PCC EHR. Keep an eye on the PaperStream application icon in your taskbar; it will typically flash orange while the scan is being processed. On the “Import Documents” screen in PCC EHR, the “Load New Files” button should highlight in yellow, indicating new files are ready to be imported. Click the “Import Documents” button to load your test scan into PCC EHR.
By default, the “Import Documents” screen usually displays documents from all file sources. You can use the “File Source” dropdown menu to filter and select your specific bucket to locate your test scan more easily.
Congratulations! Your Fujitsu fi-7160 scanner is now fully installed, configured, and ready for use with PCC EHR. For further details on managing and importing documents in PCC EHR, consult the guide Import and Attach a Document to a Patient’s Chart. You have successfully completed the process of “cara menginstal scanner fujitsu” for your Fujitsu fi-7160 in an English-speaking environment.
