
Advanced IP Scanner is a fast and free network scanning software designed to quickly detect all network computers and provide access to them. This powerful tool allows you to remotely turn PCs on and off, establish connections via Radmin, and perform a variety of other network management tasks with just a few clicks.
Understanding Advanced IP Scanner in 3 Minutes (Video Overview)
[Unfortunately, the video link is not provided, so I will skip embedding a video here. If a video was provided, I would analyze its content and potentially reference it in the text.]
Network Scanning and Retrieving IP and MAC Addresses
Advanced IP Scanner excels at rapidly scanning your network to identify active devices. It retrieves essential information such as IP addresses and MAC addresses, providing a clear overview of your network landscape.
Getting Started with Advanced IP Scanner
Performing a Network Scan
-
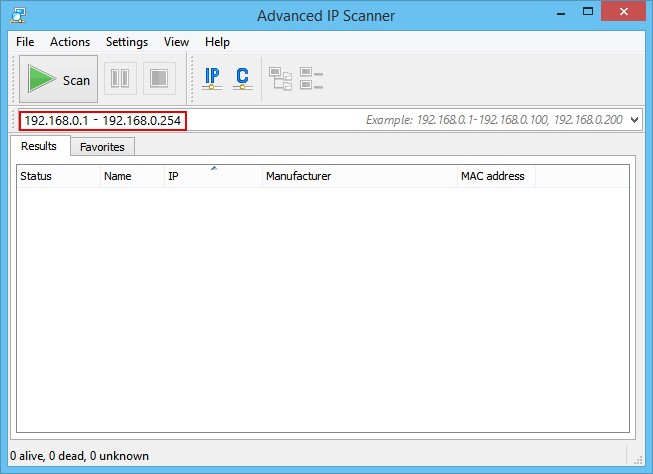
Specify your IP Address Range: Begin by entering the IP address range you wish to scan. The “IP” button on the toolbar is a helpful shortcut that automatically sets the IP address range to match your current network. This feature simplifies the process, especially for users who are not deeply familiar with network configurations.
-
Initiate the Scan: Once the IP range is defined, click the “Scan” button. Advanced IP Scanner will then commence scanning the specified range. The duration of the scan depends on the size of the IP range and network speed, but Advanced IP Scanner is known for its efficiency. Upon completion, the software will present a list of all detected computers and devices within your network.
Creating a Favorite Computer List for Regular Use
For users who frequently interact with specific computers on their network, Advanced IP Scanner offers a “Favorites” feature. This allows for quick access to frequently used machines without needing to rescan the entire network each time.
-
Scan Your Network: Start with a network scan as described in the previous section to populate the list of available computers.
-
Add to Favorites: After the scan is complete, select the computers you want to add to your favorites list. Right-click on the selected computer(s) and choose the “Add to Favorites” option from the context menu. This action saves the selected devices to your personalized favorites list.
-
Accessing Favorites: Navigate to the “Favorites” tab within Advanced IP Scanner. Here, you will find the list of computers you have added. This tab provides a streamlined view of your essential network devices, making routine tasks more efficient.
-
Manually Adding Computers to Favorites: You can also manually add computers to your “Favorites” list without scanning. Go to “Actions → Add computer…” in the main menu. A dialog box will appear, prompting you to enter the computer’s details, such as IP address and name. This is useful for adding devices that might be offline during a scan or for adding devices based on known information.
You can also save and load your favorites list. This feature is useful for backing up your list or transferring it to another computer. The lists can be saved in .xml, .html, and .csv formats.
Saving a Favorites List:
- Context Menu: Right-click within the “Favorites” tab and select “Save Selected”.
- Main Menu: Go to “File → Save As…”.
Loading a Favorites List:
- Main Menu: Navigate to “File → Load Favorites”.
Integrating Radmin with Advanced IP Scanner
Radmin (Remote Administrator) is a powerful remote control software for Windows, allowing you to operate remote computers as if you were physically present. Advanced IP Scanner seamlessly integrates with Radmin to enhance your remote management capabilities.
-
Select a Target Computer: Choose a computer from the network scan results or from your “Favorites” tab that you wish to control remotely.
-
Radmin Connection Options: If Radmin Server is detected on the selected computer, you can connect using various Radmin connection types. These options are available in the context menu when you right-click on a computer. To use Radmin remote control, Radmin Viewer must be installed on your local machine. You can download it for free from www.radmin.com/download/.
Advanced IP Scanner also supports using a portable version of Radmin Viewer. To enable this, go to “Settings → Options… → Misc” and check “Use portable version of Radmin Viewer” and specify the path to the portable viewer executable.
Advanced IP Scanner Functions in Detail
Saving Scan Lists
Advanced IP Scanner allows you to save scan results for later review or documentation. You can save the list of computers from the active tab (either “Scan Results” or “Favorites”). Files can be saved in .xml, .html, or .csv formats, offering flexibility in how you use the data.
Methods to Save Scan Lists:
- Context Menu: Right-click on the list and select “Save Selected”.
- Main Menu: Go to “File → Save As…”.
Loading Scan Lists
The “Load List” function is specifically for the “Favorites” list. It allows you to load a previously saved list of favorite computers from a file. Only .xml files are supported for loading into the “Favorites” list, ensuring data integrity and compatibility.
Method to Load Favorites List:
- Main Menu: Navigate to “File → Load Favorites”.
Toolbar – Class “C” Subnet
The “Class “C” Subnet” toolbar button simplifies scanning a standard Class C subnet. When activated, it automatically sets the starting IP address to ***.***.***.0 and the ending IP address to ***.***.***.255, where ***.***.*** represents the active network portion of your currently entered IP address. This is a quick way to scan a common network range.
How to Use Class “C” Subnet Scan:
-
Toolbar: Click the “Class “C” Subnet” button on the toolbar.
Toolbar – Active Computer Subnet
The “IP” button on the toolbar, labeled “Active Computer Subnet” in the original text, is designed to automatically define the IP address range based on your computer’s current subnet mask. This function dynamically adjusts the scan range to match your network configuration, making it highly convenient for scanning your local network segment.
How to Use Active Computer Subnet Scan:
-
Toolbar: Click the “IP” button on the toolbar.
Tools – Ping
The “Ping” tool integrated into Advanced IP Scanner allows you to quickly check the reachability of a remote computer. It opens a command prompt window and executes the ping command, sending ICMP echo requests to the target computer.
Accessing the Ping Tool:
-
Context Menu: Right-click on a computer in the list, select “Tools → Ping”.
-
Main Menu: Go to “Actions → Tools → Ping”.
Tools – Tracert
“Tracert” (traceroute) is another network diagnostic tool available within Advanced IP Scanner. It traces the route that packets take to reach a remote computer, showing each hop along the way. This can be useful for diagnosing network connectivity issues and identifying bottlenecks.
Accessing the Tracert Tool:
-
Context Menu: Right-click on a computer, select “Tools → Tracert”.
-
Main Menu: Go to “Actions → Tools → Tracert”.
Tools – Telnet
Advanced IP Scanner provides a “Telnet” tool for establishing a Telnet connection to a selected computer on the standard Telnet port (port 23). Telnet is often used for basic text-based communication with network devices or servers.
For using a custom Telnet client instead of the default one, you can specify the path to your preferred Telnet client in “Settings → Options… → Misc”.
Accessing the Telnet Tool:
-
Context Menu: Right-click on a computer, select “Tools → Telnet”.
-
Main Menu: Go to “Actions → Tools → Telnet”.
Tools – SSH
The “SSH” (Secure Shell) tool allows you to connect to a remote computer using an SSH client. SSH provides a secure encrypted connection, commonly used for remote server administration and secure file transfers. You can configure a custom SSH client in “Settings → Options… → Misc”.
Accessing the SSH Tool:
-
Context Menu: Right-click on a computer, select “Tools → SSH”.
-
Main Menu: Go to “Actions → Tools → SSH”.
Options – Performance
The “Performance” settings in Advanced IP Scanner allow you to fine-tune the scan process. The “High accuracy scan level (low speed)” option increases scan accuracy by scanning each computer multiple times. However, this option will increase the scan time.
The scan speed slider lets you adjust the scanning speed, effectively managing CPU and network load. This is useful for optimizing performance based on your network environment and system resources.
Click “OK” to save any changes to the performance settings.
Accessing Performance Options:
-
Main Menu: Go to “Settings → Options → Performance”.
Options – Resources
The “Resources” section in the Options dialog lets you select which resources Advanced IP Scanner should scan for on network devices. By reducing the number of selected resources, you can significantly decrease the scan time. This is helpful when you are only interested in specific types of information.
Click “OK” to apply changes to the resource settings.
Accessing Resource Options:
-
Main Menu: Go to “Settings → Options → Resources”.
Options – Misc
The “Misc” (Miscellaneous) settings section in Advanced IP Scanner offers various customization options. You can enable automatic checking for updates, configure custom clients for SSH, Telnet, FTP, and HTTP, and enable the portable version of Radmin Viewer.
Additionally, in this section, you can enable alternating row colors in the scan results table for improved readability.
Accessing Miscellaneous Options:
-
Main Menu: Go to “Settings → Options → Misc”.
Shutting Down Computers Remotely
Advanced IP Scanner allows you to remotely shut down computers on your network, provided you have the necessary administrative privileges.
Methods to Shut Down a Remote Computer:
- Main Menu: Go to “Actions → Shutdown”.
- Context Menu: Right-click on a computer and select “Shutdown”.
- Toolbar: Click the “Shutdown” button (additional buttons can be added to the toolbar via the “View” menu in the main menu).
After initiating the shutdown, a dialog box will appear, offering several options:
-
“Force shutdown”: This option forcefully shuts down or reboots the computer, even if programs are running and unsaved data may be lost. Warning messages about potential data loss may be suppressed.
-
“Reboot”: Restarts the computer instead of completely powering it off.
-
“Message”: Sends a warning message to the user of the remote computer, indicating that “Your computer will restart in N seconds”.
Cancelling Remote Shutdown
If a remote shutdown has been initiated, but you need to cancel it, Advanced IP Scanner provides a “Cancel Shutdown” function.
Methods to Cancel Remote Shutdown:
- Main Menu: Go to “Actions → Cancel shutdown”.
- Context Menu: Right-click on the computer and select “Cancel shutdown”.
- Toolbar: Click the “Cancel shutdown” button (addable via “View” menu).
Wake-on-LAN
The “Wake-on-LAN” (WoL) feature allows you to remotely power on computers that support WoL. This command is only effective for computers where the MAC address has been identified during a previous scan.
Methods to Use Wake-on-LAN:
- Main Menu: Go to “Actions → Wake-on-LAN”.
- Context Menu: Right-click on the computer and select “Wake-on-LAN”.
- Toolbar: Click the “Wake-on-LAN” button (addable via “View” menu).
Explore Computer
The “Explore” function in Advanced IP Scanner opens Windows Explorer displaying the shared resources of the selected computer. This provides quick access to shared folders and files on the remote machine.
Methods to Explore a Computer:
- Main Menu: Go to “Actions → Explore”.
- Context Menu: Right-click on the computer and select “Explore”.
- Toolbar: Click the “Explore” button (addable via “View” menu).
HTTP Connection
Advanced IP Scanner allows you to connect to a computer via HTTP (Hypertext Transfer Protocol) using your default web browser or a custom browser you have configured in the settings.
Methods to Initiate HTTP Connection:
- Main Menu: Go to “Actions → HTTP”.
- Computer List: Double-click the computer icon in the list, then double-click “HTTP” for connection.
- Toolbar: Click the HTTP button (addable via “View” menu).
HTTPS Connection
Similar to HTTP, Advanced IP Scanner supports HTTPS (HTTP Secure) connections. HTTPS provides an encrypted connection for secure web browsing. The same browser client configured for HTTP is used for HTTPS connections.
Methods to Initiate HTTPS Connection:
- Main Menu: Go to “Actions → HTTPS”.
- Computer List: Double-click the computer icon, then double-click “HTTPS” for connection.
- Toolbar: Click the HTTPS button (addable via “View” menu).
FTP Connection
The “FTP” (File Transfer Protocol) connection feature in Advanced IP Scanner enables you to connect to computers using FTP, typically for file sharing and management. You can specify a custom FTP client in “Settings → Options… → Misc”.
Methods to Initiate FTP Connection:
- Main Menu: Go to “Actions → FTP”.
- Computer List: Double-click the computer icon, then double-click “FTP” for connection.
- Toolbar: Click the FTP button (addable via “View” menu”).
Radmin Connection
This function directly launches Radmin Viewer to establish a remote control session with the selected computer. This is a quick shortcut for initiating Radmin control if you have Radmin installed.
Methods to Initiate Radmin Connection:
- Main Menu: Go to “Actions → Radmin”.
- Context Menu: Right-click on the computer and select “Radmin”.
- Computer List: Double-click the computer icon, then double-click “Radmin” for connection.
- Toolbar: Radmin button (addable via “View” menu).
Remote Desktop Protocol (RDP) Connection
RDP (Remote Desktop Protocol), developed by Microsoft, allows you to connect to a remote Windows computer and use its graphical interface. Advanced IP Scanner integrates with RDP to easily initiate remote desktop sessions.
Methods to Initiate RDP Connection:
- Main Menu: Go to “Actions → RDP”.
- Context Menu: Right-click on the computer and select “RDP”.
- Computer List: Double-click the computer icon, then double-click “RDP” for connection.
- Toolbar: RDP button (addable via “View” menu).