Choosing the best AC recharge for your car can be tricky. This guide reviews the AC Pro recharge kit, outlining its features and providing a step-by-step process for recharging your car’s AC system. We used this kit on a 2001 Toyota 4Runner, achieving excellent results. This easy DIY solution can save you a trip to the mechanic and keep you cool all summer long.
Is AC Pro the Best AC Recharge Kit for You?
AC Pro is a popular choice for DIY car AC recharges. Before diving into the process, it’s crucial to understand if this kit is right for your situation. AC Pro, like other recharge kits, is designed for systems with low refrigerant levels, not for major repairs. If your AC compressor is broken or you have significant leaks, this kit won’t solve the problem. Consult a mechanic for complex issues. However, if your system just needs a boost, AC Pro could be the Best Ac Recharge For Car to get you back on the road comfortably.
How to Use AC Pro: A Step-by-Step Guide
Checking the Initial Charge
Before recharging, determine your system’s current refrigerant level. With the engine running and the AC on full blast, locate the low-pressure service port. AC Pro’s website (http://acprocold.com/ask-the-pro/port-locator/) provides port locations for various vehicles. Unscrew the gauge from the AC Pro bottle and attach it to the low-pressure port. Important: Do not pull the lever on the gauge yet, as this will release refrigerant.
The gauge reading will indicate if your system needs a recharge. A low reading suggests a potential leak or compressor issue, requiring professional attention. Our 4Runner’s gauge fell within the Low/Filled range, indicating a need for additional refrigerant.
Filling the System
After checking the initial charge, disconnect the gauge. Shake the AC Pro bottle vigorously, remove the safety tab, and reattach the gauge to the bottle. With the engine still running and the AC on high, connect the hose and gauge to the low-pressure port.
While filling, tilt the bottle occasionally to ensure proper refrigerant flow. Monitor the gauge every 30 seconds and stop filling when the needle reaches the “Filled” zone. Our 4Runner used about three-quarters of the bottle. Disconnect the hose and replace the port cap.
Testing the Results
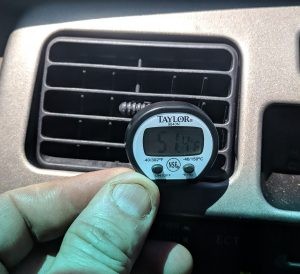
Start your engine and test the AC. After using AC Pro, our 4Runner’s AC blew 51-degree air on an 85-degree day. The system maintained its charge for a week following the recharge, demonstrating the effectiveness of the AC Pro kit.
Why Choose AC Pro as the Best AC Recharge for Car?
AC Pro offers several advantages:
- Fast and Easy: The entire process takes about 15 minutes.
- Effective Cooling: Provides colder and drier air for optimal comfort.
- Leak Sealer: Contains a leak sealer to address common minor leaks.
- System Protection: Includes anti-wear additives to extend system life.
- Convenient Kit: Comes with a reusable trigger dispenser, built-in gauge, and a 24-inch hose.
Conclusion
AC Pro offers a convenient and cost-effective solution for recharging your car’s AC. While not a fix for major problems, it’s a great option for boosting a low system. By following these steps, you can easily recharge your AC and enjoy a cool ride. Remember to always consult a mechanic for persistent AC issues or if you suspect significant damage.