Installing printers and scanners on Linux Mint is generally a straightforward process, often automatically detecting and configuring your devices. However, sharing your scanner, especially models like the Epson L210, across a network might require a few extra steps. This guide will walk you through installing your Epson L210 printer and scanner on Linux and then focus on how to share your scanner so others on your network can use it.
Before You Begin: Ensure Package Integrity
Sometimes, installation issues arise due to broken packages. Specifically, the lsb package, which is essential for compatibility with certain drivers, might not be fully installed. If you’ve encountered problems installing printers or scanners before, it’s wise to check for and fix broken packages first.
Fixing Broken Packages
Synaptic Package Manager can help resolve broken package issues.
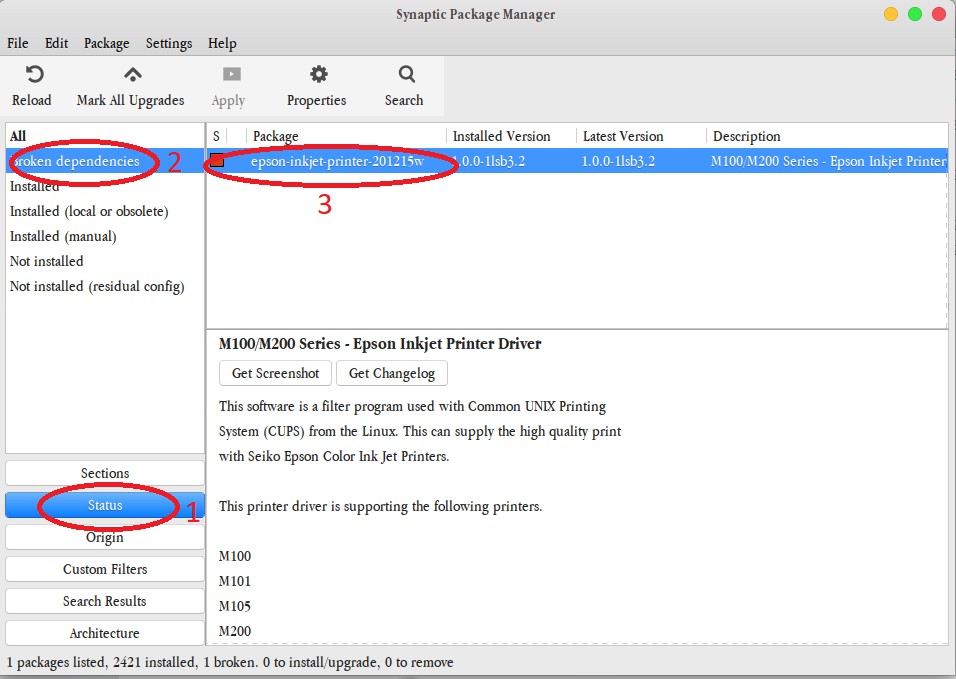
- Open Synaptic Package Manager.
- In Synaptic, change the filter to Status and then click on the Broken sub-filter.
- Right-click on any broken packages listed and select Mark for Complete Removal.
- Click Apply to execute the removal.
Installing the LSB Package
The lsb package (Linux Standard Base) is crucial for enabling Linux to work with drivers designed for broader compatibility, often necessary for printer and scanner installations from third-party manufacturers.
- Open the Terminal application.
- Type the command:
sudo apt install lsband press Enter. - After the installation completes, restart the CUPS (Common Unix Printing System) service by typing:
sudo systemctl restart cups.serviceand press Enter.
Installing Your Epson L210 Printer and Scanner via USB
The most common connection method for the Epson L210 is USB. Here’s how to install both the printer and scanner functions:
- Power on your Epson L210 printer and connect it to your Linux Mint computer using a USB cable.
- Linux Mint should automatically detect the printer and scanner. Ensure your computer is connected to the internet, as Linux Mint will attempt to find and download the necessary drivers automatically.
- Once the drivers are installed, you can verify the printer installation. Go to Menu > Administration > Printers.
- Click Add. In the device list, your Epson L210 printer should appear. Select it and click Forward.
- If Linux Mint doesn’t automatically find the exact driver for the L210, you might be prompted to select a driver. Sometimes, drivers for similar models, like the Epson L360 or even earlier L-series models like the L210 series, can work.
- After the driver is selected (or automatically chosen), click Apply.
- Your newly installed printer should now be listed in the “Printers – localhost” window. You can perform a test print by right-clicking on the printer icon and selecting “Print Test Page” to confirm successful printer installation.
Installing the Scanner Functionality
Typically, when you install an Epson L210 (or similar multifunction printer) via USB, the scanner drivers are also installed automatically. To utilize the scanner, you’ll need scanning software. Xsane is a popular and feature-rich scanning application for Linux.
- If you haven’t already, ensure your Epson L210 is connected via USB and powered on.
- Open the Software Manager (accessible via the Menu).
- In the search bar, type “xsane” and press Enter.
- Locate Xsane Image Scanning Program in the search results and double-click it.
- Click Install and wait for the installation to complete. The “Install” button will change to “Remove” once installed.
- Launch Xsane by going to Menu > Graphics > Xsane Image Scanning Program. Xsane should automatically detect your Epson L210 scanner.
- Explore the Xsane interface. It offers a comprehensive set of features for scanning, including options to save scans in various image formats and PDF.
Sharing Your Epson L210 Scanner on the Network
Sharing your Epson L210 scanner so that other computers on your network can access it requires a few additional configurations. While direct scanner sharing isn’t as straightforward as printer sharing, here’s a method using network scanning capabilities and software like sane (Scanner Access Now Easy).
Assumptions:
- Your Epson L210 is connected to a Linux Mint machine that will act as the scanner server.
- All computers are on the same local network.
Steps on the Linux Mint Scanner Server (where the Epson L210 is connected):
-
Install
sane-utilsandsaned: Open the Terminal and run:sudo apt install sane-utils saned -
Configure
saned:- Edit the
saned.conffile using a text editor:sudo nano /etc/sane.d/saned.conf - In this file, you need to specify which network addresses are allowed to access the scanner. To allow access from your entire local network (assuming your network is 192.168.1.0/24), add the following line (adjust to your network configuration if needed):
192.168.1.0/24If you want to allow access from a specific IP address only (e.g., 192.168.1.100), add:
192.168.1.100For open access (generally not recommended for security reasons unless on a trusted network), you can comment out
##access list:# access list - Save and close the file (Ctrl+X, Y, Enter in Nano).
- Edit the
-
Configure
sanefor network scanning:- Edit the
net.conffile:sudo nano /etc/sane.d/net.conf - Add the IP address of the scanner server (the Linux Mint machine the Epson L210 is connected to) to this file. If the server’s IP is 192.168.1.5, add the line:
192.168.1.5 - Save and close the file.
- Edit the
-
Start and Enable
sanedservice:sudo systemctl start saned.socket sudo systemctl enable saned.socket -
Restart
inetdorxinetd:sanedis often managed byinetdorxinetd. Restart the relevant service. The command might be:sudo systemctl restart inetd.serviceor
sudo systemctl restart xinetd.service(Use whichever is installed on your system. If unsure, try both, and if one is not installed, it will show an error, which you can ignore.)
Steps on Client Machines (computers that will access the shared scanner):
-
Install
sane-utils: On each client machine (Linux, Windows, or macOS), you need to install SANE utilities.- On Linux (e.g., Ubuntu, Mint):
sudo apt install sane-utils - On Windows: Install a SANE client like “SANE for Windows” (often found through online search).
- On macOS: Install a SANE client for macOS (also typically available online).
- On Linux (e.g., Ubuntu, Mint):
-
Configure SANE client to find the network scanner:
- On Linux clients, edit the
net.conffile:sudo nano /etc/sane.d/net.confand add the IP address of the scanner server:
192.168.1.5 (replace with your server's IP) - For Windows and macOS clients, the configuration steps will depend on the specific SANE client software you installed. Typically, you’ll need to provide the IP address of the scanner server in the client software’s settings.
- On Linux clients, edit the
-
Test Scanning from the Client: Use a scanning application (like Xsane on Linux clients, or the scanning software installed on Windows/macOS) on the client machine. The network scanner (your Epson L210 shared from the server) should now be detectable and usable.
Important Considerations for Scanner Sharing:
- Firewall: Ensure that firewalls on both the scanner server and client machines are not blocking communication on the ports used by SANE (port 6566). You might need to configure firewall rules to allow traffic on this port.
- Security: Be mindful of network security when sharing devices. Restricting access in
saned.confto specific IP ranges or addresses is recommended for trusted networks. - Scanner Driver on Clients: While SANE handles network communication, you might still need basic scanner drivers installed on client machines, especially for operating systems other than Linux, to ensure proper communication with the shared scanner service.
- Alternative Methods: For simpler sharing in some environments, consider if your router or network devices offer USB sharing capabilities, though software-based sharing with SANE provides more flexibility in Linux environments.
CONCLUSION
Installing your Epson L210 printer and scanner on Linux Mint is generally automatic, especially via USB. Sharing the scanner requires a bit more configuration, primarily using the sane utilities to enable network scanning. By following these steps, you can effectively share your Epson L210 scanner across your network, making it accessible from multiple computers. Remember to consider network security and firewall settings when setting up scanner sharing.