Advanced IP Scanner is a robust, free, and fast network scanning software designed to quickly analyze your network. This tool efficiently detects all network computers and devices, providing you with immediate access. With just a few clicks, you can remotely power PCs on or off, establish connections via Radmin, and perform a wide range of network management tasks.
Video Guide: Advanced IP Scanner in Under 3 Minutes
[Include a link to a relevant video tutorial here if available, or suggest creating one. For now, placeholder text:]
[Watch a quick video tutorial on using Advanced IP Scanner]
Network Scanning and Retrieving IP and MAC Addresses
Advanced IP Scanner excels at rapidly scanning your network to identify active devices and gather essential information such as IP and MAC addresses. This capability is crucial for network administrators and anyone needing to understand their network layout.
Getting Started with Advanced IP Scanner
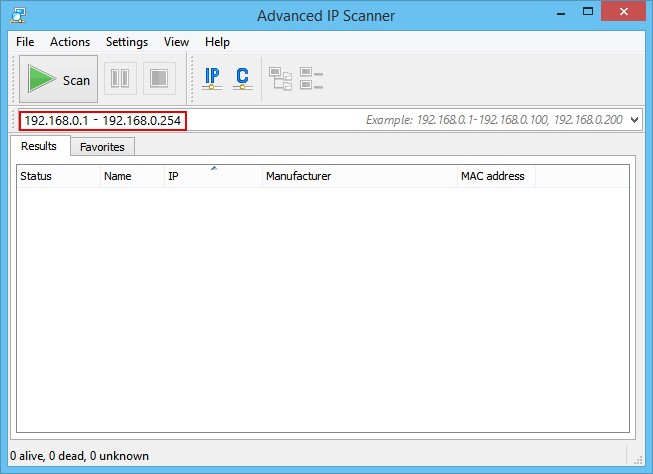
Performing a Network Scan
- Specify IP Address Range: Input the IP address range you wish to scan. The “IP” button on the toolbar is a helpful shortcut for automatically setting the IP address range of your current network.
- Initiate Scan: Click the “Scan” button. The software will begin scanning the specified IP range. Once the scan is complete, a comprehensive list of all detected computers and devices on the network will be displayed.
Creating a Favorite Computer List for Regular Use
For users who frequently interact with the same set of computers, Advanced IP Scanner allows the creation of a “Favorites” list for quick access.
-
Scan Your Network: Begin by performing a network scan as described above to populate the list of available computers.
-
Add to Favorites: Select the computers you want to add to your Favorites list. Right-click on the selected computer(s) and choose “Add to Favorites” from the context menu.
- Access Favorites Tab: Navigate to the “Favorites” tab within the Advanced IP Scanner interface. Here, you’ll find your saved list of computers for easy and repeated access.
- Manually Add Computers: You can also manually add computers to your Favorites list by selecting “Actions → Add computer…” from the main menu. Enter the computer’s details in the dialog box that appears.
The Favorites list can be saved as an XML, HTML, or CSV file.
Saving the Favorites List:
- Context Menu: Right-click within the Favorites tab and select “Save Selected”.
- Main Menu: Go to “File → Save As…”.
To load a saved Favorites list, use the main menu: “File → Load Favorites”.
Integrating Radmin with Advanced IP Scanner
Radmin is a leading remote control software for Windows, allowing you to operate remote computers with full graphical interface control as if you were directly in front of them. Advanced IP Scanner seamlessly integrates with Radmin for enhanced remote management capabilities.
-
Select Target Computer: Choose a computer from the network scan results or your Favorites list.
-
Radmin Connection Options: If Radmin Server is detected on the selected computer, you can connect to it by right-clicking and choosing the appropriate Radmin connection type from the context menu. You need Radmin Viewer installed to establish a connection. Download it for free from www.radmin.com/download/.
Advanced IP Scanner also supports portable versions of Radmin Viewer. To use a portable version, enable “Use portable Radmin Viewer version” in “Settings → Options… → Misc” and specify the path to the portable viewer executable.
Key Functions and Features
Saving and Loading Computer Lists
Save List: This function allows you to save the currently displayed list of computers from any tab (Scan results or Favorites). Lists can be saved in .xml, .html, or .csv formats.
Methods to Save:
- Context Menu: Right-click in the computer list and select “Save Selected”.
- Main Menu: Navigate to “File → Save As…”.
Load List: The Load List function is specifically for the “Favorites” list, allowing you to import a previously saved list from a file. Only .xml files are supported for loading into Favorites.
Method to Load:
- Main Menu: Go to “File → Load Favorites”.
Toolbar Subnet Options
Class “C” Subnet: The “Class “C” subnet” toolbar button quickly sets the IP address range to scan a Class C subnet. It automatically configures the starting IP address to ***.***.***.0 and the ending IP address to ***.***.***.255, using the active IP address values already entered.
Using Class “C” Subnet:
- Toolbar: Click the “Class “C” subnet” button.
Active Computer Subnet: The “IP” button on the toolbar, labeled “Active Computer Subnet” configures the IP range based on your computer’s current subnet mask. This automatically determines the starting and ending IP addresses according to your network configuration.
Using Active Computer Subnet:
- Toolbar: Click the “IP” button.
Network Tools: Ping, Tracert, Telnet, and SSH
Advanced IP Scanner integrates essential network tools for deeper device analysis and management.
Ping: Initiate a ping command to a remote computer to test network connectivity and response time.
Methods to Ping:
- Context Menu: Right-click on a computer and select “Tools → Ping”.
- Main Menu: Go to “Actions → Tools → Ping”.
Tracert (Trace Route): Use Tracert to trace the route packets take to reach a remote computer, displaying each hop along the path.
Methods to Tracert:
- Context Menu: Right-click on a computer and select “Tools → Tracert”.
- Main Menu: Go to “Actions → Tools → Tracert”.
Telnet: Open a terminal connection to a remote computer on the standard Telnet port. You can configure a custom Telnet client path in “Settings → Options… → Misc” if you prefer not to use the default client.
Methods to Telnet:
- Context Menu: Right-click on a computer and select “Tools → Telnet”.
- Main Menu: Go to “Actions → Tools → Telnet”.
SSH: Connect to a remote computer via SSH using a user-defined SSH client. Specify your preferred SSH client in “Settings → Options… → Misc”.
Methods to SSH:
- Context Menu: Right-click on a computer and select “Tools → SSH”.
- Main Menu: Go to “Actions → Tools → SSH”.
Performance and Resource Options
Performance Settings: The “High accuracy scan level (slow speed)” option allows for multiple scans of each computer to increase scanning accuracy, at the cost of scan time. The scan speed slider lets you adjust the scan speed, balancing network load and processor usage.
Accessing Performance Options:
- Main Menu: Go to “Settings → Options → Performance”.
Resource Settings: The “Resources” section lets you choose which resources are scanned. Reducing the number of selected resources can significantly decrease scan times.
Accessing Resource Options:
- Main Menu: Go to “Settings → Options → Resources”.
Miscellaneous Options
The “Misc” settings section allows you to enable automatic update checks, configure custom paths for SSH, Telnet, FTP, and HTTP clients. You can also enable the portable Radmin Viewer version and set its path here. Table color alternation can also be enabled for visual preference.
Accessing Miscellaneous Options:
- Main Menu: Go to “Settings → Options → Misc”.
Remote Shutdown and Wake-on-LAN
Shutting Down Computers: Advanced IP Scanner allows you to remotely shut down selected computers (provided you have the necessary permissions).
Methods to Shutdown:
- Main Menu: “Actions → Shutdown”.
- Context Menu: Right-click on a computer and select “Shutdown”.
- Toolbar: Use the “Shutdown” button (addable via “View” menu in main menu).
Upon initiating shutdown, a dialog box appears with several options:
- Force shutdown: Shuts down/reboots the computer even if programs are running and unsaved data warnings appear.
- Reboot: Restarts the computer instead of shutting it down.
- Message: Sends a warning message to the user before shutdown: “Your computer will restart in N seconds.”
Canceling Remote Shutdown: If a remote shutdown has been initiated, you can cancel it using the “Cancel Shutdown” function.
Methods to Cancel Shutdown:
- Main Menu: “Actions → Cancel shutdown”.
- Context Menu: Right-click on a computer and select “Cancel shutdown”.
- Toolbar: Use the “Cancel shutdown” button (addable via “View” menu in main menu).
Wake-on-LAN: The Wake-on-LAN function sends a wake command to selected computers, provided their MAC addresses have been identified during a scan and Wake-on-LAN is enabled on the target machine.
Methods to Wake-on-LAN:
- Main Menu: “Actions → Wake-on-LAN”.
- Context Menu: Right-click on a computer and select “Wake-on-LAN”.
- Toolbar: Use the “Wake-on-LAN” button (addable via “View” menu in main menu).
Exploring and Connecting to Computers
Browse Computer: This function opens Windows Explorer, displaying the shared resources of the selected computer, allowing you to browse files and folders if permissions allow.
Methods to Browse:
- Main Menu: “Actions → Browse”.
- Context Menu: Right-click on a computer and select “Browse”.
- Toolbar: Use the “Browse” button (addable via “View” menu in main menu).
HTTP Connection: Connect to a computer via HTTP protocol using your chosen browser. Configure your preferred HTTP client in “Settings → Options… → Misc”. If no client is specified, the default system browser is used.
Methods to Connect via HTTP:
- Main Menu: “Actions → HTTP”.
- Computer List: Double-click the computer icon, then double-click “HTTP” connection type.
- Toolbar: Use the HTTP button (addable via “View” menu in main menu).
HTTPS Connection: Similar to HTTP, this connects via HTTPS protocol for a secure connection. Uses the same browser client configured for HTTP.
Methods to Connect via HTTPS:
- Main Menu: “Actions → HTTPS”.
- Computer List: Double-click the computer icon, then double-click “HTTPS” connection type.
- Toolbar: Use the HTTPS button (addable via “View” menu in main menu).
FTP Connection: Connect to a computer via FTP protocol using a browser or a dedicated FTP client if configured in settings.
Methods to Connect via FTP:
- Main Menu: “Actions → FTP”.
- Computer List: Double-click the computer icon, then double-click “FTP” connection type.
- Toolbar: Use the FTP button (addable via “View” menu in main menu).
Radmin Connection: Quickly launch Radmin Viewer to connect to a selected computer, provided Radmin Server is running on the remote machine.
Methods to Connect via Radmin:
- Main Menu: “Actions → Radmin”.
- Context Menu: Right-click on a computer and select “Radmin”.
- Computer List: Double-click the computer icon, then double-click “Radmin” connection type.
- Toolbar: Add Radmin button to the toolbar via “View” menu.
Remote Desktop Protocol (RDP) Connection: Connect to a computer using Microsoft’s Remote Desktop Protocol (RDP), allowing graphical remote access.
Methods to Connect via RDP:
- Main Menu: “Actions → RDP”.
- Context Menu: Right-click on a computer and select “RDP”.
- Computer List: Double-click the computer icon, then double-click “RDP” connection type.
- Toolbar: Add RDP button to the toolbar via “View” menu.
This guide provides a comprehensive overview of how to use Advanced IP Scanner 2.4 to effectively manage and analyze your network. By mastering these features, you can significantly enhance your network administration capabilities.