Advanced IP Scanner is a fast and free network scanning software that helps you quickly detect all network computers and gain access to them. With just one click, you can power on and off remote PCs, establish connections via Radmin, and much more. This guide will walk you through the various functionalities of Advanced IP Scanner, ensuring you can effectively manage and monitor your network.
Understanding Network Scanning with Advanced IP Scanner
Network Scanning and Retrieving IP and MAC Addresses
Advanced IP Scanner excels at quickly scanning your network to identify active devices. It retrieves essential information such as IP addresses and MAC addresses, providing a clear overview of your network landscape.
To begin scanning your network, follow these simple steps:
-
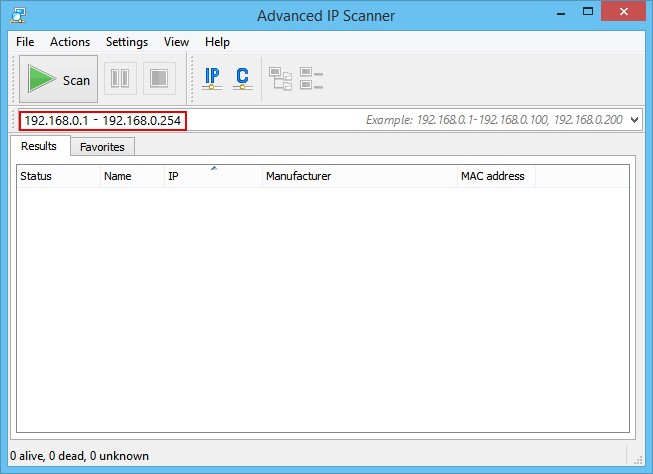
Specify IP Address Range: Locate the “IP” button on the toolbar. Clicking this will assist you in setting the appropriate IP address range for your network. This ensures the scanner focuses on the relevant section of your network.
-
Initiate Scan: Once the IP range is set, click the “Scan” button. Advanced IP Scanner will then commence scanning the specified range.
-
Review Scan Results: Upon completion of the scan, Advanced IP Scanner will present a list of all detected computers and devices within the network, displaying their IP addresses, MAC addresses, and other relevant details.
Creating a Favorite Computer List for Regular Use
For users who frequently interact with specific computers on the network, Advanced IP Scanner offers a “Favorites” feature. This allows you to create a curated list of computers for quick and easy access.
-
Scan the Network: Start by performing a network scan as described in the previous section to populate the list of available computers.
-
Add to Favorites: From the scan results, select the computers you wish to add to your favorites list. Right-click on the selected computer(s) and choose “Add to Favorites” from the context menu.
-
Access Favorites: Navigate to the “Favorites” tab within Advanced IP Scanner. Here, you will find the list of computers you have added. This tab provides a streamlined view for managing your frequently accessed devices.
-
Manually Add Computers: You can also manually add computers to your favorites list. In the “Favorites” tab, select “Actions → Add computer…” from the menu. Enter the computer’s details in the dialog box that appears.
Advanced IP Scanner also allows you to save your favorites list for backup or sharing purposes. This list can be saved in .xml, .html, or .csv formats.
Saving the Favorites List:
- Context Menu: Right-click within the “Favorites” tab and select “Save Selected”.
- Main Menu: Go to “File → Save As…”.
To load a previously saved favorites list, use the following option:
- Main Menu: “File → Load Favorites”.
Integrating Radmin for Remote Control
Advanced IP Scanner seamlessly integrates with Radmin, a popular remote control software for Windows. This integration allows you to remotely manage computers directly from the scan results.
-
Select a Computer: Choose a computer from either the network scan results or your “Favorites” list.
-
Radmin Connection: If Radmin Server is detected on the selected computer, you can initiate a connection by right-clicking and choosing the desired Radmin connection type from the context menu. To utilize this feature, ensure you have Radmin Viewer installed. You can download it for free from www.radmin.com/download/.
For added flexibility, Advanced IP Scanner supports the portable version of Radmin Viewer. To use it, enable “Use portable version of Radmin Viewer” in “Settings → Options… → Misc” and specify the path to the portable viewer.
Advanced IP Scanner Functions in Detail
Saving and Loading Computer Lists
Save List Function
This function allows you to save the computer list currently displayed in the active tab (either scan results or favorites). The lists can be saved in .xml, .html, or .csv formats, providing versatility for data management and reporting.
How to Save:
- Context Menu: Right-click in the computer list and select “Save Selected”.
- Main Menu: Navigate to “File → Save As…”.
Load List Function
The Load List function is specifically for the “Favorites” list. It enables you to import a previously saved list of computers from a file, allowing for quick restoration of your preferred computer configurations. Only .xml files are supported for loading into the “Favorites” list, ensuring data integrity and compatibility.
How to Load:
- Main Menu: Go to “File → Load Favorites”.
Toolbar Options: Subnetting and IP Range
Class “C” Subnet Tool
The Class “C” subnet tool simplifies IP range selection for typical Class C networks. It automatically sets the starting IP address to ***.***.***.0 and the ending IP address to ***.***.***.255, where “***” represents the active IP address values you have entered. This is particularly useful for quickly scanning standard home or small office networks.
How to Use:
-
Toolbar: Click the “Class “C” subnet” button on the toolbar.
Active Computer Subnet Tool
The “IP” button, or Active Computer Subnet tool, is designed to dynamically determine and set the IP range based on your computer’s subnet mask. It automatically configures the start and end IP addresses to match your current network configuration, making network scanning setup more intuitive and accurate.
How to Use:
-
Toolbar: Click the “IP” button on the toolbar.
Network Tools Integration: Ping, Tracert, Telnet, and SSH
Advanced IP Scanner integrates essential network diagnostic tools directly into its interface, allowing for quick troubleshooting and network analysis.
Ping
The Ping tool initiates a terminal window and executes the ping command to a remote computer. This helps verify network connectivity and measure response times.
How to Use Ping:
-
Context Menu: Right-click on a computer and select “Tools → Ping”.
-
Main Menu: Go to “Actions → Tools → Ping”.
Tracert
Tracert (Trace Route) is another valuable network tool that traces the route packets take to reach a remote computer. It displays each hop along the path, helping to identify network bottlenecks or routing issues.
How to Use Tracert:
-
Context Menu: Right-click on a computer and select “Tools → Tracert”.
-
Main Menu: Go to “Actions → Tools → Tracert”.
Telnet
Telnet allows you to initiate a terminal connection to a selected computer on the standard Telnet port. It’s useful for basic remote text-based access and troubleshooting specific services. You can configure a custom Telnet client in the settings if you prefer not to use the default client.
How to Use Telnet:
-
Context Menu: Right-click on a computer and select “Tools → Telnet”.
-
Main Menu: Go to “Actions → Tools → Telnet”.
SSH
SSH (Secure Shell) provides a secure encrypted network connection to a remote computer. Advanced IP Scanner allows you to connect via an SSH client of your choice, configurable in the program settings. This is crucial for secure remote administration and file transfers.
How to Use SSH:
-
Context Menu: Right-click on a computer and select “Tools → SSH”.
-
Main Menu: Go to “Actions → Tools → SSH”.
Configuration Options: Performance, Resources, and Miscellaneous
Advanced IP Scanner offers several configuration options to tailor its behavior to your specific needs.
Performance Settings
The “Performance” settings allow you to fine-tune the scanning process. The “High accuracy scan level (low speed)” option increases scan accuracy by scanning each computer multiple times but at a slower pace. The scan speed slider lets you adjust the scanning speed, balancing between speed and network/processor load.
How to Access Performance Settings:
-
Main Menu: Go to “Settings → Options → Performance”.
Resource Settings
The “Resources” section lets you select which resources Advanced IP Scanner should scan for. Reducing the number of selected resources can significantly decrease the scan time, especially in large networks.
How to Access Resource Settings:
-
Main Menu: Go to “Settings → Options → Resources”.
Miscellaneous Settings
The “Miscellaneous” settings provide options for program behavior, such as enabling automatic update checks, configuring default clients for SSH, Telnet, FTP, and HTTP, and enabling the portable Radmin Viewer. You can also enable alternating row colors in the computer list for improved readability.
How to Access Miscellaneous Settings:
-
Main Menu: Go to “Settings → Options → Misc”.
Remote Management Features: Shutdown, Wake-on-LAN, and Explore
Advanced IP Scanner provides features to remotely manage computers on your network, enhancing its utility beyond just network discovery.
Shutdown Function
The shutdown function allows you to remotely power off selected computers, provided you have the necessary permissions.
How to Shutdown Remotely:
- Main Menu: Go to “Actions → Shutdown”.
- Context Menu: Right-click on a computer and select “Shutdown”.
- Toolbar: Use the “Shutdown” button (additional buttons can be added via “View” in the main menu).
After initiating shutdown, a dialog box appears, offering several options:
-
Force shutdown: Shuts down the computer immediately, even if programs are running and unsaved data may be lost.
-
Reboot: Restarts the computer instead of shutting it down.
-
Message: Sends a warning message to the user, indicating the computer will restart in a specified number of seconds.
Cancel Remote Shutdown
If a remote shutdown has been initiated, but you need to cancel it, Advanced IP Scanner provides a “Cancel Shutdown” function.
How to Cancel Shutdown:
- Main Menu: Go to “Actions → Cancel shutdown”.
- Context Menu: Right-click on a computer and select “Cancel shutdown”.
- Toolbar: Use the “Cancel shutdown” button (addable via “View” in the main menu).
Wake-on-LAN (WoL)
Wake-on-LAN functionality allows you to remotely power on computers that support WoL. This command is only effective if the MAC address of the target computer has been identified during a previous scan.
How to Use Wake-on-LAN:
- Main Menu: Go to “Actions → Wake-on-LAN”.
- Context Menu: Right-click on a computer and select “Wake-on-LAN”.
- Toolbar: Use the “Wake-on-LAN” button (addable via “View” in the main menu).
Explore Computer
The “Explore” function directly opens Windows Explorer, displaying the shared resources and files of the selected computer, facilitating easy file access and management.
How to Explore:
- Main Menu: Go to “Actions → Explore”.
- Context Menu: Right-click on a computer and select “Explore”.
- Toolbar: Use the “Explore” button (addable via “View” in the main menu).
Connection Protocols: HTTP, HTTPS, FTP, Radmin, and RDP
Advanced IP Scanner supports various connection protocols, making it a versatile tool for network management.
HTTP Connection
HTTP connection allows you to connect to a computer via the HTTP protocol using your chosen web browser. You can configure a preferred HTTP client in the settings; otherwise, the default browser is used.
How to Connect via HTTP:
- Main Menu: Go to “Actions → HTTP”.
- Computer List: Double-click a computer icon, then double-click “HTTP” for connection.
- Toolbar: Use the HTTP button (addable via “View” in the main menu).
HTTPS Connection
HTTPS provides a secure HTTP connection. Advanced IP Scanner uses the same browser client configured for HTTP connections.
How to Connect via HTTPS:
- Main Menu: Go to “Actions → HTTPS”.
- Computer List: Double-click a computer icon, then click “HTTPS” for connection.
- Toolbar: Use the HTTPS button (addable via “View” in the main menu).
FTP Connection
FTP (File Transfer Protocol) allows you to connect to a computer’s FTP server. You can specify a preferred FTP client in the settings.
How to Connect via FTP:
- Main Menu: Go to “Actions → FTP”.
- Computer List: Double-click a computer icon, then double-click “FTP” for connection.
- Toolbar: Use the FTP button (addable via “View” in the main menu).
Radmin Connection
As previously mentioned, Advanced IP Scanner integrates deeply with Radmin, allowing for seamless remote control sessions.
How to Connect via Radmin:
- Main Menu: Go to “Actions → Radmin”.
- Context Menu: Right-click on a computer and select “Radmin”.
- Computer List: Double-click a computer icon, then double-click “Radmin”.
- Toolbar: Radmin button can be added via “View” in the main menu.
Remote Desktop Protocol (RDP)
RDP, developed by Microsoft, enables a graphical interface for remotely working on another computer. Advanced IP Scanner supports direct RDP connections.
How to Connect via RDP:
- Main Menu: Go to “Actions → RDP”.
- Context Menu: Right-click on a computer and select “RDP”.
- Computer List: Double-click a computer icon, then double-click “RDP”.
- Toolbar: RDP button can be added via “View” in the main menu.
By mastering these features and functionalities, you can effectively utilize Advanced IP Scanner to manage, monitor, and troubleshoot your network environment efficiently.