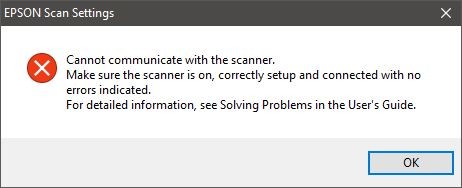
Encountering an “Epson scan cannot communicate with the scanner” error can be frustrating when you need to scan important documents or photos. This error, as shown below, indicates that your computer is unable to connect and communicate with your Epson scanner.
This guide provides comprehensive troubleshooting steps to resolve this Epson scanner communication error for both USB and network connections, ensuring you can quickly get back to scanning. Epson scanners are versatile and can connect via USB for a direct connection or through a wireless or wired network for shared access. Let’s explore how to fix this issue based on your connection type.
Understanding the Epson Scanner Communication Error
Before diving into specific solutions, it’s important to understand why this error occurs. The “Epson scan cannot communicate with the scanner” message typically means there’s an interruption or misconfiguration in the communication pathway between your computer and the scanner. This can stem from various sources, including:
- Connection Issues: Problems with the USB cable or network connection.
- Software Glitches: Outdated or corrupted Epson Scan software or scanner drivers.
- Scanner Settings: Incorrect configuration within the Epson Scan settings.
- Device Conflicts: Conflicts with other devices or software on your computer.
By systematically addressing these potential causes, you can effectively diagnose and resolve the communication error.
Troubleshooting USB Connection Issues
If your Epson scanner is connected to your computer via USB, follow these steps to troubleshoot the communication error:
Checking Physical Connections
The most basic step is to ensure a solid physical connection.
- Power Cycle: Turn off both your Epson scanner and your computer. Wait for about 30 seconds, then power them back on. This simple step can often resolve temporary glitches.
- Inspect USB Cable: Check the USB cable for any signs of damage, such as fraying or bending. If possible, try a different USB cable to rule out a faulty cable.
- Direct Connection: Ensure the USB cable is connected directly to your computer and the scanner. Avoid using USB hubs or extension cables as they can sometimes interfere with the connection.
- Port Test: Try connecting the USB cable to different USB ports on your computer. This helps determine if a specific USB port is causing the issue.
Testing USB Connection in Epson Scan Settings
Epson Scan Settings utility allows you to test the connection and identify your scanner.
-
Open Epson Scan Settings: Locate and open the “Epson Scan Settings” application on your computer. This is usually found in your applications or programs list.
-
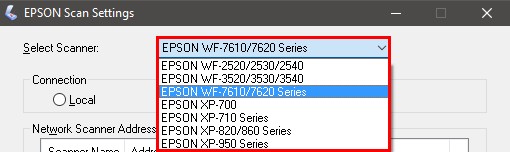
Select Your Scanner: In the Epson Scan Settings window, you should see a drop-down list to select your scanner. Choose your Epson product from this list.
Note: If your scanner is not listed, you may need to download and install the correct Epson Scan driver and software for your specific scanner model from the official Epson support website.
-
Test the Connection: Click the “Test” button within the Epson Scan Settings. This will initiate a connection test between your computer and the scanner.
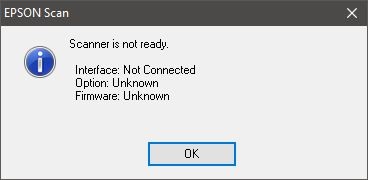
You will receive one of two results:
Successful Test Unsuccessful Test 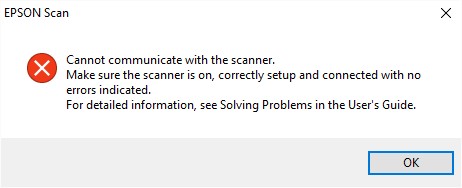
Addressing Unsuccessful USB Test
If the test is unsuccessful, follow these steps, testing the connection after each step:
-
Power Check: Double-check that your Epson scanner is powered on and that the power indicator light is illuminated. If it’s not powering on, ensure the power cable is securely connected to both the scanner and a working wall outlet. Try a different wall outlet directly, avoiding extension cords initially. You can also test with a different power cable if available.
-
USB Reconnection: Disconnect the USB cable from both your computer and the Epson scanner. Wait a few seconds, then firmly reconnect the cable to both devices.
-
Alternative USB Cable: Try using a different USB cable. A damaged or low-quality USB cable can often cause communication problems.
-
Device Manager Check (Windows): For Windows users, open Device Manager and look for “Imaging Devices.” Expand this section and find your Epson scanner.
- No Issues: If your scanner is listed without any warning icons (question mark “?”, exclamation mark “!”, or red “X”), proceed to reinstalling the Epson Scan software.
- Warning Icons or Unknown Device: If you see a warning icon next to your scanner or it’s listed as an “Unknown device,” this indicates a driver issue. Uninstall the Epson Scan software and drivers completely and then reinstall them from the Epson website. This ensures you have a clean and correctly installed driver.
Troubleshooting Network Connection Issues
For Epson scanners connected via a network (Wi-Fi or Ethernet), these steps will help resolve communication errors:
Configuring Network Connection in Epson Scan Settings
Similar to USB, you need to configure the network connection within Epson Scan Settings.
-
Open Epson Scan Settings: Open the “Epson Scan Settings” application on your computer.
-
Select Your Scanner: Choose your Epson scanner from the drop-down list, just as you would for a USB connection.
Note: If your scanner isn’t listed, ensure your scanner is properly connected to your network and that you have installed the network Epson Scan software for your model from Epson’s website.
-
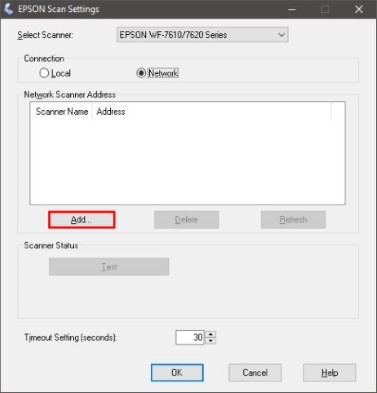
Set Connection Type to Network: Change the “Connection Type” setting to “Network.” This option is usually available in a drop-down menu within Epson Scan Settings.
-
Add Scanner: Click the “Add” button to search for scanners on your network.
-
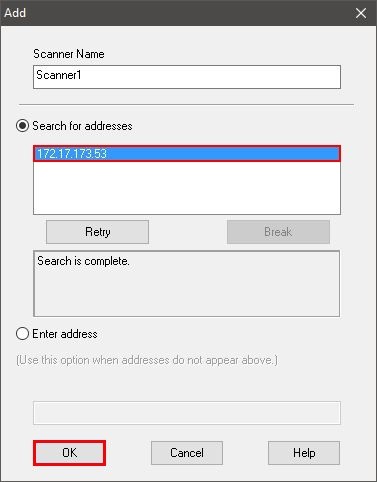
Select Scanner from List or Add by IP Address: A list of detected scanners on your network should appear.
- Select from List: If your scanner appears in the list, select it and click “OK.”
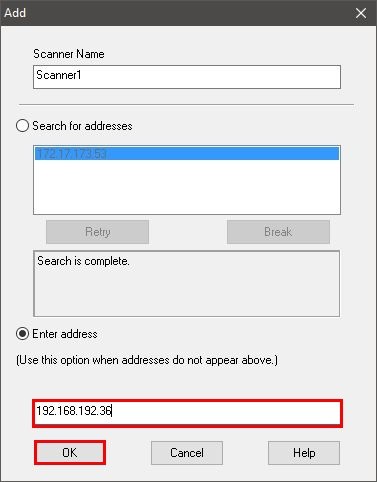
- Add by IP Address: If your scanner doesn’t appear, or for a more reliable connection, click “Enter Address.” You will need to find your scanner’s IP address, which can usually be found on the scanner’s control panel in its network settings or by printing a network status sheet from the scanner.
- Type the scanner’s IP address in the provided field.
- Click “OK.”
-
Test Network Connection: Click the “Test” button to check the network connection.
Successful Test Unsuccessful Test
Addressing Unsuccessful Network Test
If the network test fails, troubleshoot with these steps:
- Confirm Scanner Power: Ensure your Epson scanner is powered on.
- Verify Network Connection:
- Same Network: For Wi-Fi connections, confirm that both your computer and the Epson scanner are connected to the same Wi-Fi network (SSID).
- IP Address Verification: Double-check that the IP address listed for your scanner in Epson Scan Settings is correct and matches the IP address assigned to your scanner on your network. You can verify this information by printing a Wi-Fi status sheet or accessing the network settings directly from your scanner’s control panel.
- Test Again: After verifying the network details, click “Test” again in Epson Scan Settings to re-evaluate the connection.
Conclusion
By systematically following these troubleshooting steps for both USB and network connections, you should be able to resolve the “Epson scan cannot communicate with the scanner” error. Remember to check basic connections first, then move to software and settings configurations. In most cases, carefully following these instructions will restore your Epson scanner’s functionality and allow you to continue scanning without interruption. If you continue to experience issues, consult your Epson scanner’s manual or contact Epson support for further assistance.