
Experiencing the frustrating “Cannot communicate with scanner” error when using your Epson L360 can disrupt your workflow. This issue prevents your computer from recognizing and communicating with your scanner, halting your scanning tasks. Fortunately, this problem is often resolvable with a systematic approach. This guide provides comprehensive troubleshooting steps to get your Epson L360 scanner communicating smoothly again, whether you’re using a USB or network connection.
Troubleshooting USB Connection for Epson L360 Scanner
If your Epson L360 scanner is connected via USB and you’re encountering communication errors, follow these steps to diagnose and resolve the issue:
-
Access Epson Scan Settings:
Begin by opening the Epson Scan Settings utility on your computer. This software is essential for configuring and testing your scanner connection. You can usually find it by searching “Epson Scan Settings” in your operating system’s search bar.
alt=”Epson Scan Settings icon for launching scanner configuration”
-
Select Your Epson L360 Scanner:
Within the Epson Scan Settings window, locate the drop-down list that displays available scanners. Choose your Epson L360 printer model from this list.
Note: If your Epson L360 is not listed, it’s crucial to download and install the correct Epson Scan driver and software for your model from the official Epson support website.
-
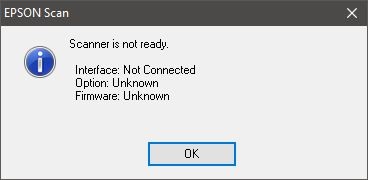
Initiate a Connection Test:
Click the Test button in the Epson Scan Settings. This action will attempt to establish communication between your computer and the Epson L360 scanner. Observe the test results to determine the next steps.
Successful Test Unsuccessful Test alt=”Epson Scan successful USB connection test notification” alt=”Epson Scan unsuccessful USB connection test error message” 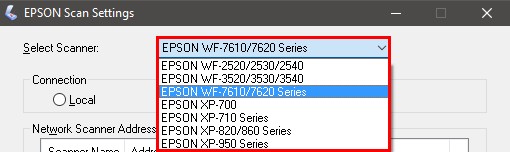
-
Follow Instructions Based on Test Result:
Expand the section below that corresponds to your test result for further troubleshooting.
If the USB Test Was Successful:
Congratulations! Your Epson L360 scanner is communicating correctly via USB.
- Click OK on the successful test notification.
- Click OK again to close the Epson Scan Settings window.
- Your Epson L360 scanner should now be ready to scan via the USB connection. Try initiating a scan to confirm.
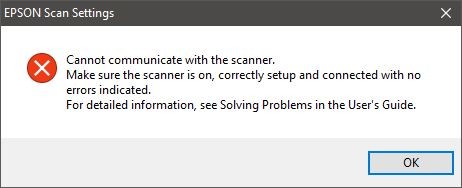
If the USB Test Was Unsuccessful:
An unsuccessful test indicates a problem with the USB connection or scanner setup. Follow these steps, testing the connection after each step to see if the issue is resolved:
-
Verify Power Status:
Ensure your Epson L360 printer is powered ON. A simple oversight can be the cause. If it’s not powering on, try these power-related checks:
- Direct Wall Outlet: Plug the power cable directly into a wall outlet, bypassing any extension cords or surge protectors.
- Alternative Power Cable: If possible, test with a different power cable to rule out a faulty cable.
-
Reconnect USB Cable:
Unplug the USB cable from both your computer and the Epson L360 printer. Wait a few seconds, then firmly reconnect the USB cable to both devices. Ensure the connections are secure.
-
Try a Different USB Cable:
A damaged or faulty USB cable can prevent proper communication. If you have a spare USB cable, especially a USB 2.0 cable (compatible with most scanners), try using it to connect your scanner.
-
Check Device Manager for Driver Issues (Windows):
For Windows users, the Device Manager is a crucial tool for identifying driver problems.
- Open Device Manager: Right-click the Windows Start button and select “Device Manager”.
- Locate Imaging Devices: Expand the “Imaging devices” category.
- Check for Errors: Look for your Epson L360 scanner. It should appear without any warning icons like a question mark (?), exclamation mark (!), or a red X.
- Error Icons or Unknown Device: If you see these icons or “Unknown device,” it suggests a driver issue. Uninstall and reinstall the Epson Scan software from the Epson website to correct potential driver corruption.
Troubleshooting Network Connection for Epson L360 Scanner
If you are using a network connection (Wi-Fi or Ethernet) for your Epson L360 scanner and are facing communication errors, these steps will help you troubleshoot:
-
Open Epson Scan Settings:
As with USB troubleshooting, start by opening the Epson Scan Settings utility.
alt=”Epson Scan Settings application launcher icon”
-
Select Your Epson L360 Scanner:
Choose your Epson L360 model from the scanner drop-down list, just as you would for a USB connection.
Note: Again, if your scanner is not listed, ensure you’ve installed the necessary Epson Scan software and drivers from the Epson website.
-
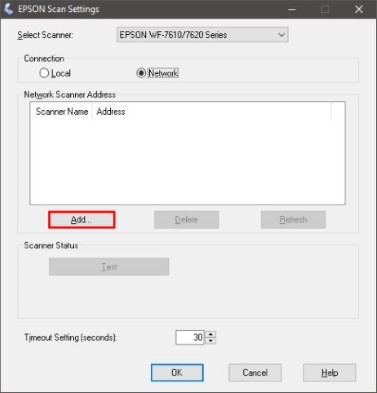
Set Connection Type to Network:
In Epson Scan Settings, locate the Connection Type setting and change it to Network. This tells Epson Scan to look for your scanner on the network.
alt=”Setting the connection type to network in Epson Scan Settings”
-
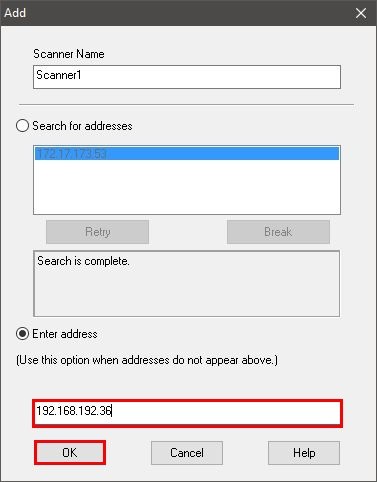
Add Your Scanner (If Necessary):
If your scanner isn’t automatically detected, you may need to manually add it. Click the Add button.
-
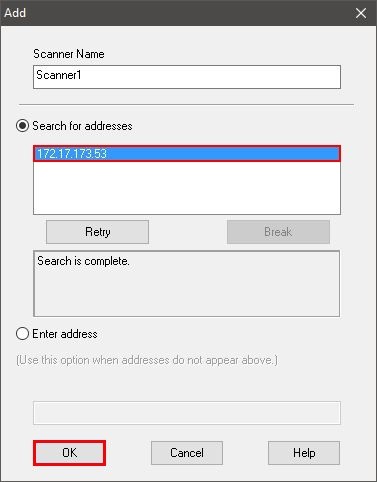
Select or Enter Scanner IP Address:
In the “Add Printer” window, your scanner might be listed with its IP address.
- If Listed: Click on your Epson L360’s IP address in the list and click OK.
-
If Not Listed (Enter Address): If the IP address isn’t shown, click Enter Address.
- Type in the IP address of your Epson L360 printer. You can usually find the IP address on your printer’s network configuration page or control panel.
- Click OK.
-
Initiate Network Test:
Click the Test button to check the network communication with your Epson L360 scanner.
Successful Test Unsuccessful Test alt=”Epson Scan successful network connection test confirmation” alt=”Epson Scan unsuccessful network connection test notification” -
Follow Instructions Based on Network Test Result:
Expand the relevant section below based on whether your network test was successful or unsuccessful.
If the Network Test Was Successful:
Excellent! Your Epson L360 scanner is successfully communicating over the network.
- Click OK on the successful test notification.
- Click OK again to close Epson Scan Settings.
- Your Epson L360 is now configured for wireless scanning. Try scanning to confirm the connection.
If the Network Test Was Unsuccessful:
A failed network test means there’s an issue with the network connection. Troubleshoot using these steps:
-
Click OK on the unsuccessful test message.
-
Verify Power: Double-check that your Epson L360 printer is powered on.
-
Network Configuration Check: Print a Wi-Fi Status sheet directly from your Epson L360 printer or access the scanner’s network settings through its control panel. Verify the following:
- Same Network (SSID): If using Wi-Fi, confirm that both your computer and the Epson L360 are connected to the same Wi-Fi network name (SSID). They must be on the same network for communication.
- Correct IP Address: Ensure the IP address listed for your Epson L360 in the scanner list within Epson Scan Settings matches the IP address shown on the printer’s Wi-Fi status sheet or network settings.
-
Retest Connection: After verifying the network details, click the Test button in Epson Scan Settings again to re-evaluate the connection.
By systematically following these troubleshooting steps for both USB and network connections, you should be able to resolve the “Cannot communicate with scanner” error on your Epson L360 and restore your scanning functionality. If you continue to experience issues, consult the Epson support website or contact Epson customer support for further assistance.