
Seeing your check engine light illuminate can be unsettling. It’s a clear signal from your car that something isn’t quite right under the hood. While it’s crucial to understand that driving with the check engine light constantly on isn’t advisable, there are times when you might want to diagnose the issue yourself and potentially turn off the light after addressing a minor problem. This is where a car scanner, also known as an OBD2 scanner, becomes an invaluable tool.
With a car scanner, you can effectively communicate with your vehicle’s computer, read diagnostic trouble codes (DTCs), and yes, even turn off that persistent check engine light. This guide will walk you through the simple steps of using a car scanner to turn off your engine light, potentially saving you a trip to the mechanic for issues you can handle at home. It’s important to note that while turning off the light is straightforward, understanding why it came on and addressing the underlying issue is paramount for your vehicle’s health.
Before we dive into the steps, let’s clarify what you’ll need. The key component is an OBD2 scanner. It’s essential to choose a scanner that not only reads diagnostic codes but also has the capability to clear them. Some basic, entry-level code readers might only provide you with error codes, leaving you unable to reset the check engine light. Investing in a scanner with code-clearing functionality offers more control and allows you to complete the entire process from diagnosis to light reset.
Step-by-Step Guide: Clearing Your Check Engine Light with a Car Scanner
Before proceeding, it’s worth mentioning that familiarity with using a car scanner can be helpful, but it’s certainly not a prerequisite. The process is designed to be user-friendly, much like operating a smartphone. If you’re completely new to OBD2 scanners, there are numerous resources available online, including video tutorials, that can quickly bring you up to speed on basic operation.
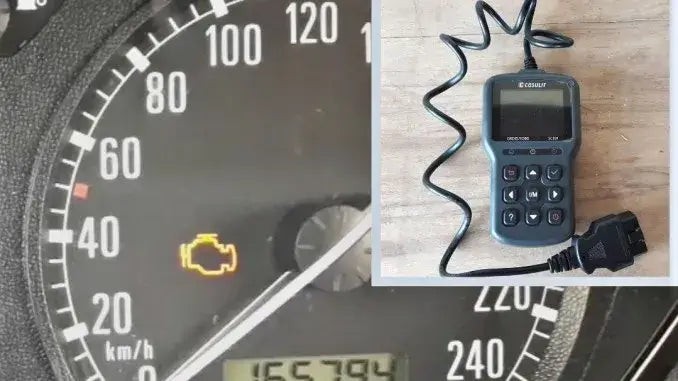
1. Locate the OBDII Port in Your Vehicle
The first step is to find your car’s OBDII port. This port is the communication interface between your car’s computer and the scanner. It’s typically located inside the cabin, under the dashboard on the driver’s side. You might need to look around the area beneath the steering column and above the pedals. In some vehicles, it may be concealed by a small cover.
2. Connect the Car Scanner to the OBDII Port
Once you’ve located the OBDII port, take your car scanner and firmly plug its connector into the port. Ensure it’s securely connected to establish a proper communication link.
3. Turn On the Ignition to Accessory Mode
Next, you need to turn on your car’s ignition to the “Accessory” or “ON” position. This means providing power to the car’s electrical systems without actually starting the engine. Typically, you can achieve this by turning the key to the first or second position (depending on your car model) or pressing the start button once or twice without pressing the brake pedal. Refer to your owner’s manual if you’re unsure about how to enter accessory mode in your vehicle.
4. Allow the Car Scanner to Scan for Error Codes
With the scanner connected and the ignition in the correct mode, power on your car scanner. It should automatically begin communicating with your car’s computer. Initiate a scan for error codes using the scanner’s menu. This process allows the scanner to retrieve any stored diagnostic trouble codes that are causing the check engine light to be on.
5. Read and Carefully Interpret the Error Codes
Once the scan is complete, the car scanner will display a list of error codes. There might be just one code or multiple codes, depending on the issues your vehicle is experiencing. This is a crucial step: do not simply clear the codes without understanding what they mean.
Each error code is a specific identifier that points to a particular problem area in your car. Your scanner may have a built-in DTC library that allows you to look up the meaning of each code directly on the device. Alternatively, you can easily search for the codes online using a search engine. Understanding the error codes is essential to determine the severity of the problem and whether it’s something you can address yourself or requires professional attention. Ignoring the underlying issue and only turning off the light will likely result in the check engine light reappearing soon.
6. Navigate to the Menu Option to Clear the Check Engine Light
After you have reviewed and understood the error codes, and if you’ve addressed the underlying issue or determined the code relates to a minor or resolved problem (like a loose gas cap which you’ve now tightened), you can proceed to clear the check engine light. Navigate through your car scanner’s menu to find the option for “Clear Codes,” “Erase Codes,” or something similarly worded. The exact menu layout may vary slightly depending on your scanner model, but the basic function remains the same.
7. Return to the Main Menu of the Car Scanner
Once you’ve selected the option to clear the codes and confirmed your action (you might be prompted to confirm), allow the scanner to complete the process. Afterward, return to the scanner’s main or start menu. This ensures you’re ready for the next steps and that the scanner has finished its code clearing operation.
8. Disconnect the Car Scanner from the OBDII Port
Now that you’ve cleared the codes, carefully disconnect the car scanner from the OBDII port. If your scanner has a power button, turn it off before disconnecting. Handle the connector with care to avoid damaging the OBDII port or the scanner’s connector.
9. Turn Off the Ignition Completely
Turn the ignition off completely. Remove the key from the ignition or, for cars with start buttons, ensure the car is fully powered down.
10. Start the Engine and Check if the Light is Off
Finally, start your car’s engine as you normally would. Observe the dashboard to see if the check engine light has turned off. In most cases, if the issue has been resolved or the code was related to a transient problem, the light should now be off. Start and stop the engine a few more times to confirm that the check engine light remains off after the engine reaches its normal operating temperature.
Conclusion
As demonstrated, using a car scanner to turn off your check engine light is a relatively straightforward process. It typically takes just a few minutes and can be accomplished by anyone with a basic understanding of car scanners. The ability to clear the check engine light yourself is a significant advantage for DIY car owners, saving both time and potential mechanic fees for minor issues.
However, it’s crucial to reiterate the importance of responsible usage. While clearing the check engine light is easy, it should always be accompanied by an understanding of the underlying error codes and addressing the root cause of the problem. Turning off the light without addressing the issue is only a temporary fix and can potentially lead to more significant problems down the road. Using a car scanner empowers you to take a more active role in your car’s maintenance, but always prioritize proper diagnosis and repair over simply masking symptoms.