
The Epson L360 is a popular all-in-one printer known for its affordability and efficiency. However, unlike the printer driver, the scanner driver often requires a separate installation. This guide provides a comprehensive walkthrough on how to download the Epson L360 scanner driver and use the scanning functionality.
Downloading the Epson L360 Scanner Driver
Before you can scan, you need to download and install the correct scanner driver for your operating system (Windows, macOS, or Linux). Here’s how:
- Visit the Official Epson Website: Navigate to the official Epson support website for your region.
- Search for Your Printer: Use the search bar to find the Epson L360 support page. You can usually search by product name or model number.
- Locate the Drivers & Downloads Section: On the L360 support page, find the section dedicated to drivers and downloads.
- Select Your Operating System: Choose your specific operating system from the available options. This ensures you download the compatible driver.
- Download the Scanner Driver: Look for a file specifically labeled as “Scanner Driver” or “Epson Scan.” Download this file to your computer. Note: Sometimes the scanner and printer drivers are bundled together. If you can’t find a separate scanner driver, install the combined driver package. The scanner functionality will be included.
Installing the Epson L360 Scanner Driver
Once the driver file is downloaded, follow these steps to install it:
- Run the Setup File: Double-click the downloaded driver file (usually an .exe for Windows or a .dmg for macOS) to start the installation process.
- Follow the On-Screen Instructions: The installation wizard will guide you through the necessary steps. Read and accept the license agreement.
- Connect Your Printer: The installer might prompt you to connect your Epson L360 to your computer via USB cable. Ensure the printer is powered on.
- Complete the Installation: Once the installation is complete, you may need to restart your computer.
Scanning with the Epson L360
After installing the driver, you can start scanning:
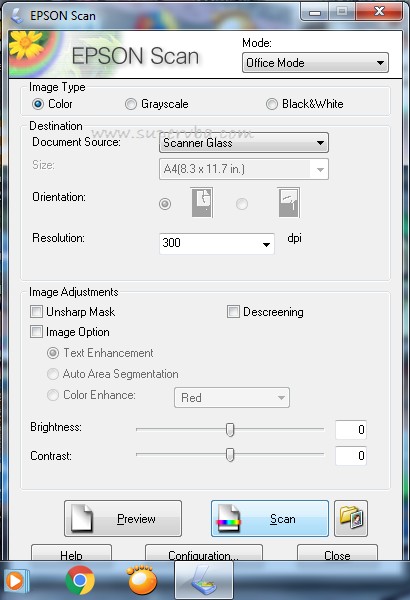
- Open Epson Scan: Launch the “Epson Scan” application. You can usually find it in your applications folder or by searching for it.
- Choose Your Scan Settings: Select the desired scan mode (e.g., “Full Auto Mode,” “Home Mode,” “Office Mode,” “Professional Mode”). Adjust settings like document type, resolution (DPI), image format (JPEG, PDF), and scan area.
- Preview Your Scan: Click “Preview” to see a preview of the scanned document. This allows you to adjust settings before finalizing the scan.
- Start Scanning: Click “Scan” to begin the scanning process. The scanned document will be saved to the designated folder, often your “Pictures” or “Documents” folder.
By following these steps, you can successfully download the Epson L360 scanner driver, install it, and utilize the scanning functionality of your printer. Remember to always download drivers from the official Epson website to ensure compatibility and security.