Setting up your Epson L210 scanner on Linux Mint is generally a straightforward process, thanks to the operating system’s built-in driver support. Linux Mint, known for its user-friendliness, often automatically detects and installs printer and scanner drivers as soon as you connect your device. However, there might be instances where you need to ensure certain packages are in place or manually install a scanning utility to get everything working smoothly.
This guide will walk you through the steps to successfully install your Epson L210 scanner on Linux Mint, ensuring your system is ready to scan documents and images effortlessly. We’ll cover essential prerequisites and the installation process to get your scanner up and running in no time.
Preparing Your System for Epson Scanner Installation
Before diving into the scanner installation, it’s crucial to prepare your Linux Mint system to avoid potential hiccups. A common reason for installation issues is missing the lsb package. This package is sometimes required for drivers, especially those from third-party manufacturers like Epson, to function correctly on Linux.
Ensuring the LSB Package is Installed
The lsb (Linux Standard Base) package enhances compatibility by allowing Linux to utilize drivers and software designed for broader Linux distributions. It’s a good practice to ensure it’s installed before proceeding with scanner installation.
-
Open your terminal. You can usually do this by pressing
Ctrl+Alt+T. -
Type the following command and press Enter to install the
lsbpackage:sudo apt install lsbYou’ll be prompted to enter your password. Type it in and press Enter. The system will download and install the
lsbpackage if it’s not already present. -
After the installation is complete, it’s recommended to restart the CUPS (Common Unix Printing System) service. CUPS is responsible for handling printing and scanning tasks. Execute the following command in the terminal:
sudo systemctl restart cups.serviceThis command ensures that any changes related to package installations are properly applied to the scanning system.
Fixing Broken Packages (If Necessary)
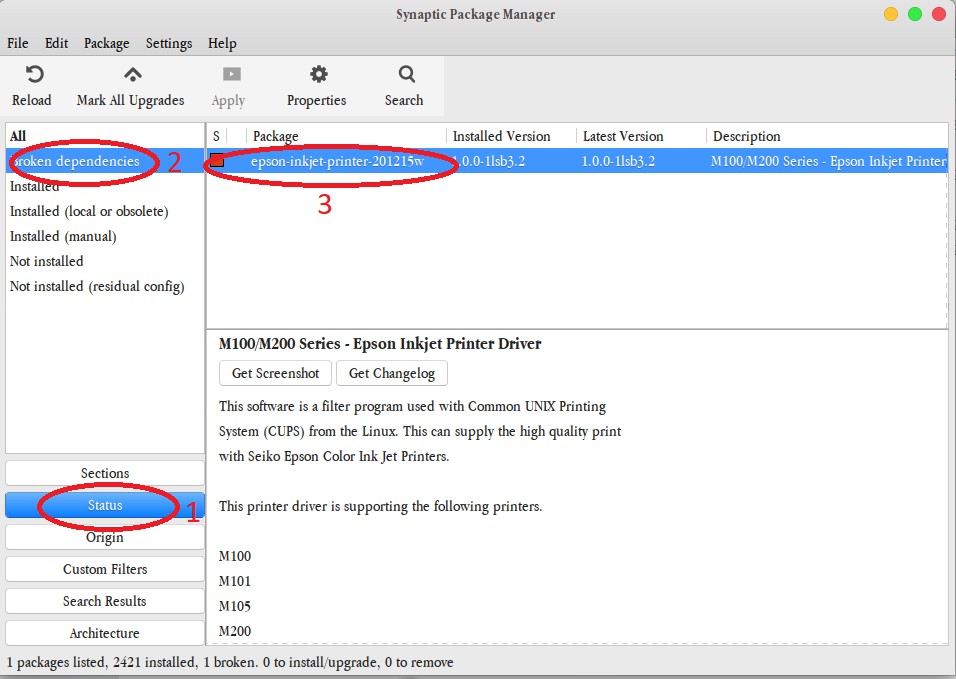
If you’ve encountered previous issues installing printers or scanners, you might have broken packages on your system. Broken packages can interfere with new installations. It’s wise to check and fix them before proceeding. Synaptic Package Manager provides an easy way to identify and repair broken packages.
- Open Synaptic Package Manager. You can find it in your menu under System or Administration, depending on your Mint version. You might be asked to enter your password to launch it.
- Once Synaptic is open, navigate to the “Status” filter on the left sidebar.
- Under “Status,” click on the “Broken” sub-filter. This will display any broken packages on your system.
- If broken packages are listed, right-click on each broken package.
- From the context menu, select “Mark for Complete Removal.” This will schedule the broken package and its related files for deletion.
- After marking all broken packages, click the “Apply” button in the toolbar.
- Synaptic will show a summary of changes. Review them and click “Apply” again to execute the removal of broken packages.
By fixing broken packages and ensuring the lsb package is installed, you’ve laid a solid foundation for a smooth Epson L210 scanner installation on your Linux Mint system.
Installing Your Epson L210 Scanner
With your system prepared, you can now proceed to install your Epson L210 scanner. Linux Mint usually handles USB scanner connections seamlessly.
USB Scanner Installation
For scanners connected via USB, Linux Mint’s plug-and-play capability often takes care of most of the installation process automatically.
- Ensure your Epson L210 scanner is powered on.
- Connect the USB cable from your scanner to an available USB port on your Linux Mint computer.
- Linux Mint should automatically detect the scanner. In many cases, it will also automatically download and install the necessary driver in the background, provided you have an active internet connection.
- To verify if the scanner is detected, you can check the system’s printer settings. Go to Menu > Administration > Printers.
- In the Printers window, you should see your Epson L210 scanner listed. It might appear under a generic name initially, but it should be recognizable as your connected scanner device.
Installing Xsane Scanner Software
While the driver installation might be automatic, you’ll need a scanning application to operate your Epson L210 scanner and perform scans. Xsane is a popular and feature-rich scanning software available for Linux.
- Open the Software Manager. You can find it in your menu, usually under System or Administration.
- In the Software Manager window, use the search function (usually in the top right corner). Type “xsane” in the search box and press Enter.
- Xsane Image Scanning Program should appear in the search results. Click on the Xsane entry.
- Click the “Install” button.
- Software Manager will then download and install Xsane and any dependencies. You might be prompted for your password to authorize the installation.
- Once the installation is complete, you can launch Xsane. Go to Menu > Graphics > Xsane Image Scanning Program.
When you open Xsane for the first time, it should automatically detect your Epson L210 scanner. You can then explore Xsane’s interface to adjust settings and start scanning your documents or photos. Xsane offers a wide range of options, including different scan modes, resolutions, and file formats (like images and PDF). Take some time to familiarize yourself with its features to get the most out of your Epson L210 scanner on Linux Mint.
Testing Your Epson L210 Scanner
After installing both the driver and Xsane, it’s essential to test if everything is working correctly.
- Open Xsane Image Scanning Program from Menu > Graphics > Xsane Image Scanning Program.
- Place a document or photo on your Epson L210 scanner bed.
- In the Xsane window, you can preview your scan. Look for a “Preview” button. Clicking it should initiate a quick preview scan.
- Adjust any settings as needed, such as resolution, scan area, or color mode.
- Once you are satisfied with the preview and settings, click the “Scan” button to start the final scan.
- Xsane will scan your document and then display the scanned image. You can then save the scanned image to your desired location and file format.
If the scan is successful, congratulations! You have successfully installed your Epson L210 scanner on Linux Mint and are ready to use it for your scanning needs.
CONCLUSION
Installing an Epson L210 scanner on Linux Mint is generally a plug-and-play experience. Linux Mint’s automatic driver detection and installation capabilities simplify the process significantly. By ensuring the lsb package is installed and utilizing the Xsane scanning software, you can quickly set up and operate your scanner. This seamless integration makes Linux Mint an excellent choice for users seeking an easy-to-use and compatible operating system for their Epson L210 scanner.